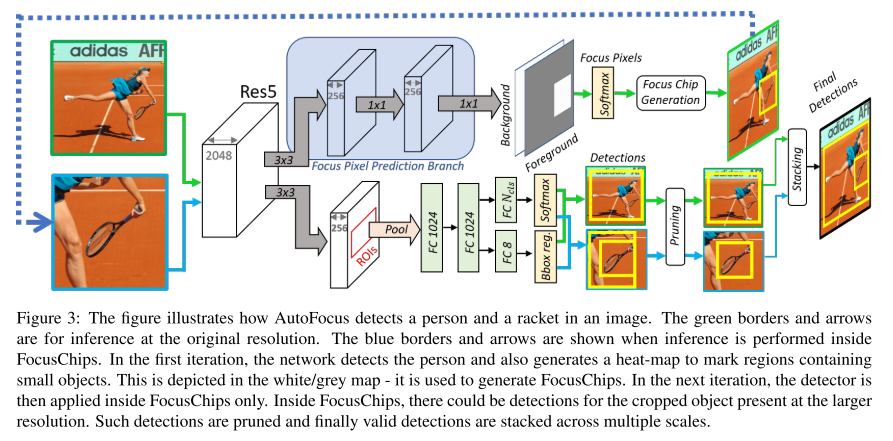
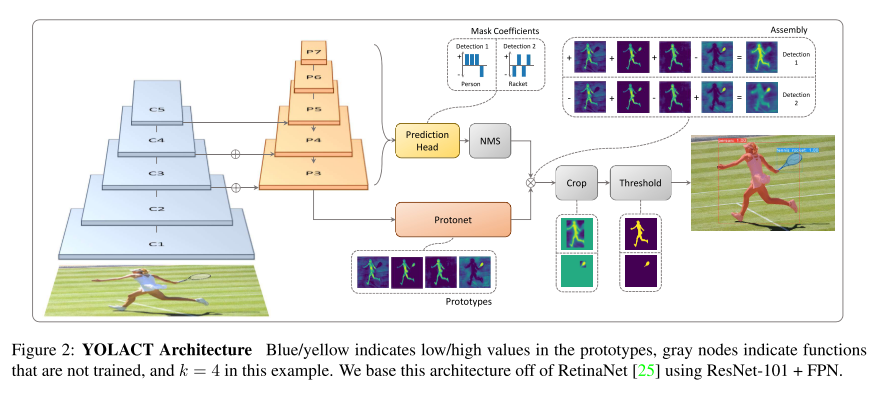
이번 ICCV 2019에 accept된 Object Detection 주제의 논문 "Gaussian YOLOv3. An Accurate and Fast Object Detector Using Localization Uncertainty for Autonomous Driving"을 한글로 리뷰하여 글로 정리를 해보았습니다.
기존 YOLO를 포함하여 대부분의 Object Detection 알고리즘들이 예측하는 결과물 중 class 정보와 objectness 정보는 확률값으로 예측을 하지만 bounding box 좌표 값들은 deterministic하게 예측을 하는 문제점을 개선하기 위한 방법을 제안하고 있습니다.
또한 이러한 방법들을 통해 localization uncertainty를 예측하고 이를 활용하여 모델의 False-Positive를 줄이고 전체적인 정확도를 높이는 방법을 제안하였습니다.
자세한 리뷰는 제 블로그 글에서 확인하실 수 있습니다! 공부하시는데 도움이 되셨으면 좋겠습니다. 감사합니다! https://www.facebook.com/groups/PyTorchKR/permalink/1497904133682596/?sfnsn=mo
You’re interested in Computer Vision, Deep Learning, and OpenCV…but you don’t know how to get started.
Follow these steps to get OpenCV configured/installed on your system, learn the fundamentals of Computer Vision, and graduate to more advanced topics, including Deep Learning, Face Recognition, Object Detection, and more!
Step #1: Install OpenCV + Python on Your System (Beginner)
Before you can start learning OpenCV you first need to install the OpenCV library on your system.
By farthe easiest way to install OpenCV is via pip:
Once you have OpenCV installed on your Windows system all code examples included in my tutorials shouldwork (just understand that I cannot provide support for them if you are using Windows).
If you are struggling to configure your development environment be sure to take a look at my book, Practical Python and OpenCV, which includes a pre-configured VirtualBox Virtual Machine.
All you need to do is installVirtualBox, download the VM file, import it and load the pre-configured development environment.
And best of all, this VM will work on Linux, macOS, and Windows!
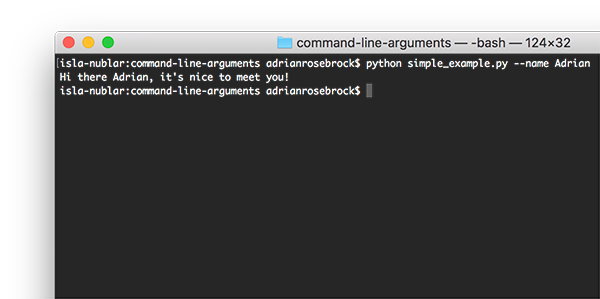
Step #2: Understand Command Line Arguments (Beginner)
Command line arguments aren’t a Computer Vision concept but they areused heavily here on PyImageSearch and elsewhere online.
If you intend on studying advanced Computer Science topics such as Computer Vision and Deep Learning then you needto understand command line arguments:
Drawing lines, rectangles, circles, and text on an image
Masking and bitwise operations
Contour and shape detection
…and more!
Additionally, if you want a consolidated review of the OpenCV library that willget you up to speed in less than a weekend, you should take a look at my book, Practical Python and OpenCV.
Step #4: Build OpenCV Mini-Projects (Beginner)
At this point you have learned the basics of OpenCV and have a solid foundation to build upon.
Take the time now to follow these guides and practice building mini-projects with OpenCV.
To start, I highly recommendyou follow this guide on debugging common “NoneType” errors with OpenCV:
You’ll see these types of errors when (1) your path to an input image is incorrect, returning incv2.imread returningNone or (2) OpenCV cannot properly access your video stream.
Trust me, at some point in your Computer Vision/OpenCV career you’ll see this error— take the time now to read the article above to learn how to diagnose and resolve the error.
The following tutorials will help you extend your OpenCV knowledge and build on the fundamentals:
Additionally, I recommend that you take these projects and extend them in some manner, enabling you to gain additional practice.
As you work through each tutorial, keep a notepad handy and jot down inspiration as it comes to you.
For example:
How might you apply the algorithm covered in a tutorial to yourparticular dataset of images?
What would you change if you wanted to filter out specific objects using contours?
Make notes to yourself and come back and try to solve these mini-projects later.
Step #5: Solve More Advanced OpenCV Projects (Intermediate)
Practice makes perfect and Computer Vision/OpenCV are no different.
After working through the tutorials in Step #4 (and ideally extending them in some manner), you are now ready to apply OpenCV to more intermediate projects.
My first suggestion is to learn how to access your webcam using OpenCV.
The following tutorial will enable you to access your webcam in a threaded, efficient manner:
These algorithms utilize keypoint detection, local invariant descriptor extraction, and keypoint matching to build a program capable of stitching multiple images together, resulting in a panorama.
There is a dedicated Optical Character Recognition (OCR) section later in this guide, but it doesn’t hurt to gain some experience with it now:
Again, keep a notepad handy as you work through these projects.
Practice extending them in some manner to gain additional experience.
Step #6: Pick Your Niche (Intermediate)
Congratulations, you have now learned the fundamentals of Image Processing, Computer Vision, and OpenCV!
The Computer Vision field is compromised of subfields (i.e., niches), including Deep Learning, Medical Computer Vision, Face Applications,and many others.
Many of these fields overlapand intertwine as well — they are not mutually exclusive.
That said, as long as you follow this page you’ll always have the proper prerequisites for a given niche, so don’t worry!
Most readers jump immediately into Deep Learning as it’s one of themost popularfields in Computer Science; however,
Where to Next?
If you need additional help learning the basics of OpenCV, I would recommend you read my book, Practical Python and OpenCV.
This book is meant to be a gentle introduction to the world of Computer Vision and Image Processing through the OpenCV library.
And if you don’t know Python, don’t worry!
Since I explain everycode examples in the book line-by-line, 1000s of PyImageSearch readers have used this book to not only learnOpenCV, but alsoPythonat the same time!
If you’re looking for a more in-depth treatment of the Computer Vision field, I would instead recommend the PyImageSearch Gurus course.
The PyImageSearch Gurus course is similar to a college survey course in Computer Vision, but muchmore hands-on and practical (including well documented source code examples).
Otherwise, my personal recommendation would be to jump into the Deep Learningsection — most PyImageSearch readers who are interested in Computer Vision are alsointerested in Deep Learning as well.
Deep Learning
Deep Learning algorithms are capable of obtaining unprecedented accuracy in Computer Vision tasks, including Image Classification, Object Detection, Segmentation, and more.
Follow these steps and you’ll have enough knowledge to start applying Deep Learning to your own projects.
Step #1: Configure your Deep Learning environment (Beginner)
Before you can apply Deep Learning to your projects, you first need to configure your Deep Learning development environment.
The following guides will help you install Keras, TensorFlow, OpenCV, and all other necessary CV and DL libraries you needto be successful when applying Deep Learning to your own projects:
Pick up a copy of my book, Deep Learning for Computer Vision with Python, which includes a VirtualBox Virtual Machine with all the DL and CV libraries you need pre-configuredand pre-installed.
All you need to do is installVirtualBox, download the VM file, import it and load the pre-configured development environment.
And best of all, this VM will work on Linux, macOS, and Windows!
Step #2: Train Your First Neural Network (Beginner)
Provided that you have successfully configured your Deep Learning development environment, you can move now to training your first Neural Network!
I recommend starting with this tutorial which will teach you the basics of the Keras Deep Learning library:
After that, you should read this guide on training LeNet, a classic Convolutional Neural Network that is both simple to understand and easy to implement:
Now that you understand what kernels and convolution are, you should move on to this guide which will teach you how Keras’ utilizes convolution to build a CNN:
So, you trained your own CNN from Step #5 — but your accurate isn’t as good as what you want it to be.
What now?
In order to obtain a highly accurate Deep Learning model, you need to tune your learning rate, the most important hyperparameterwhen training a Neural Network.
The following tutorial will teach youhow to start training, stop training, reduce your learning rate, and continue training, a critical skill when training neural networks:
This guide will teach you about learning rate schedules and decay, a method that can be quickly implemented to slowly lower your learning rate when training, allowing it to descend into lower areas of the loss landscape, and ideally obtain higher accuracy:
You should also read about Cyclical Learning Rates (CLRs), a technique used to oscillate your learning rate between an upper and lower bound, enabling your model to break out of local minima:
If you haven’t already, you will run into two important terms in Deep Learning literature:
Generalization:The ability of your model to correctly classify images that are outsidethe training set used to train the model.
Your model is said to “generalize well” if it can correctly classify images that it has neverseen before.
Generalization is absolutely criticalwhen training a Deep Learning model.
Imagine if you were working for Tesla and needed to train a self-driving car application used to detect cars on the road.
Your model worked well on the training set…but when you evaluated it on the testing set you found that the model failed to detect the majority of cars on the road!
In such a situation we would say that your model “failed to generalize”.
To fix this problem you need to apply regularization.
Regularization: The term “regularization” is used to encompass all techniques used to (1) prevent your model from overfitting and (2) generalize well to your validation and testing sets.
Regularization techniques include:
L2 regularization(also called weight decay)
Updating the CNN architecture to include dropout
You can read the following tutorial for an introduction/motivation to regularization:
Step #8: Feature Extraction and Fine-tuning Pre-trained Networks (Intermediate)
So far we’ve trained our CNNs from scratch — but is it possible to take a pre-trainedmodel and use it to classify images it was never trained on?
Yes, it absolutely is!
Taking a pre-trained model and using it to classify data it was never trained on is called transfer learning.
There are two types of transfer learning:
Feature extraction: Here we treat our CNN as an arbitrary feature extractor.
An input image is presented to the CNN.
The image is forward-propagated to an arbitrary layer of the network.
We take those activations as our outputand treat them like a feature vector.
Given feature vectors for all input images in our dataset we train an arbitrary Machine Learning model (ex., Logistic Regression, Support Vector Machine, SVM) on top of our extracted features.
When making a prediction, we:
Forward-propagate the input image.
Take the output features.
Pass them to our ML classifier to obtain our output prediction.
I’ll wrap up this section by saying thattransfer learning is a criticalskill for you to properly learn.
Use the above tutorials to help you get started, but for a deeper dive into my tips, suggestions, and best practices when applying Deep Learning and Transfer Learning, be sure to read my book:
Inside the text I not only explain transfer learning in detail, but also provide a number of case studies to show you how to successfully apply it to your own custom datasets.
Step #9: Video Classification (Advanced)
At this point you have a good understanding of how to apply CNNs to images— but what about videos?
Can the same algorithms and techniques be applied?
Video classification is an entirely different beast — typical algorithms you may want to use here includeRecurrent Neural Networks(RNNs) andLong Short-Term Memory networks(LSTMs).
However, before you start breaking out the “big guns” you should read this guide:
Inside you’ll learn how to use prediction averagingto reduce “prediction flickering”and create a CNN capable of applying stable video classification.
Step #10: Multi-Input and Multi-Output Networks (Advanced)
Imagine you are hired by a large clothing company (ex., Nordstorms, Neiman Marcus, etc.) and are tasked with building a CNN to classify two attributes of an input clothing image:
Clothing Type:Shirt, dress, pants, shoes, etc.
Color:The actual colorof the item of clothing (i.e., blue, green, red, etc.).
To get started building such a model, you should refer to this tutorial:
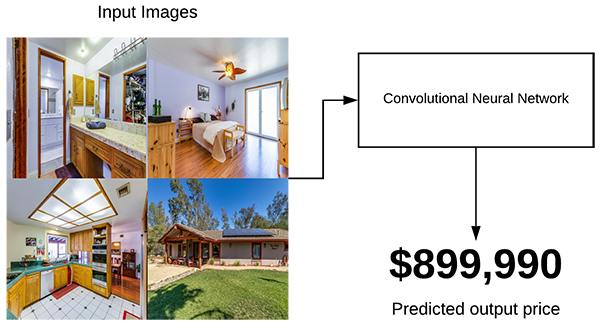
Now, let’s imagine that for your next job you are hired by real estate company used to automatically predict the price of a house based solely on input images.
You are given images of the bedroom, bathroom, living room, and house exterior.
You now need to train a CNN to predict the house price using justthose images.
To accomplish that task you’ll need a multi-input network:
The OpenCV library ships with a number of pre-trained models for neural style transfer, black and white image colorization,holistically-nested edge detectionand others — you can learn about these models using the links below:
If you intend on deploying your models to production, and more specifically, behind a REST API, I’ve authored three tutorials on the topic, each building on top of each other:
Super practical walkthroughs that present solutions to actual, real-world image classification problems, challenges, and competitions.
Hands-on tutorials (with lots of code) that not only show you the algorithms behind deep learning for computer vision but their implementations as well.
A no-nonsense teaching style that is guaranteed to help you master deep learning for image understanding and visual recognition
Otherwise, I would recommend reading the following sections of this guide:
Object Detection:State-of-the-art object detectors, including Faster R-CNN, Single Shot Detectors (SSDs), YOLO, and RetinaNet allrely on Deep Learning.
If you want to learn how to not only classifyan input image but also locate where in the object is, then you’ll want to read these guides.
Medical Computer Vision: Apply Computer Vision and Deep Learning to medical image analysis and learn how to classify blood cells and detect cancer.
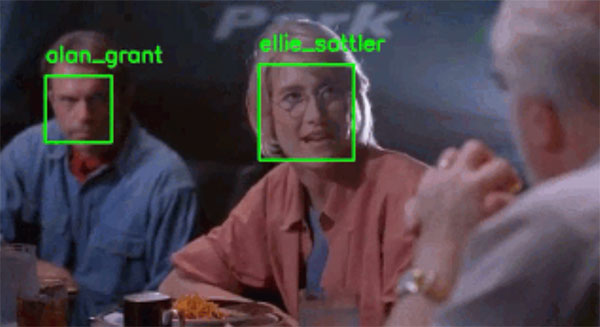
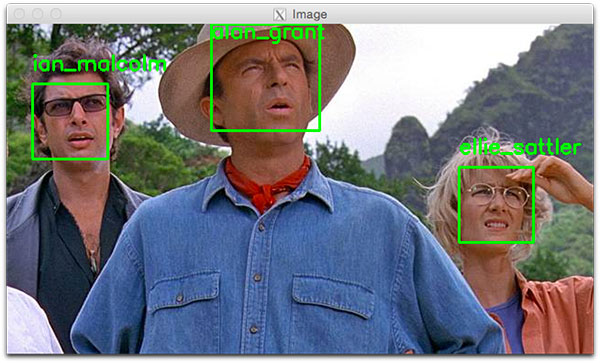
Face Applications
Using Computer Vision we can perform a variety of facial applications, including facial recognition, building a virtual makeover system (i.e., makeup, cosmetics, eyeglasses/sunglasses, etc.), or even aiding in law enforcementto help detect, recognize, and track criminals.
Computer Vision is powering facial recognition at amassivescale — just take a second to consider that over 350 millionimages are uploaded to Facebook every day.
For each of those images, Facebook is runningface detection(to detect the presence) of faces followed by face recognition(to actually tagpeople in photos).
In this section you’ll learn the basics of facial applications using Computer Vision.
Step #1: Install OpenCV, dlib, and face_recognition (Beginner)
Before you can build facial applications, you first need to configure your development environment.
Start by following Step #1 of the How Do I Get Started?section to install OpenCV on your system.
From there, you’ll need to install the dlib and face_recognition libraries.
TheInstall your face recognition librariesofthis tutorialwill help you install both dlib and face_recognition.
Make sure you have installed OpenCV, dlib, and face_recognition before continuing!
Step #2: Detect Faces in Images and Video (Beginner)
In order to apply Computer Vision to facial applications you first need to detectand findfaces in an input image.
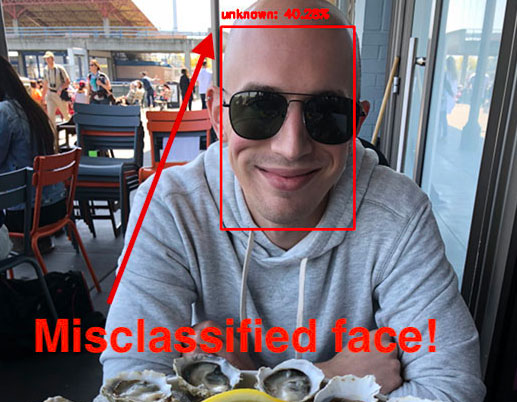
Face detection is differentthan face recognition.
During face detection we are simply trying to locatewhere in the image faces are.
Our face detection algorithms do not know whois in the image, simply that a given face existsat a particular location.
Once we have our detected faces, we pass them into a facial recognition algorithm which outputs the actual identify of the person/face.
Thus, all Computer Vision and facial applications muststart with face detection.
There are a number of face detectors that you can use, but my favorite is OpenCV’s Deep Learning-based face detector:
OpenCV’s face detector isaccurateand able torun in real-timeon modern laptops/desktops.
That said, if you’re using a resource constrained devices (such as the Raspberry Pi), the Deep Learning-based face detector may be too slow for your application.
In that case, you may want to utilizeHaar cascadesorHOG + Linear SVMinstead:
Haar cascades are veryfast but prone to false-positive detections.
It can also be a pain to properly tune the parameters to the face detector.
HOG + Linear SVM is a nice balance between the Haar cascades and OpenCV’s Deep Learning-based face detector.
This detector is slowerthan Haar but is also more accurate.
Here’s my suggestion:
If you need accuracy, go with OpenCV’s Deep Learning face detector.
If you need pure speed, go with Haar cascades.
And if you need abalancebetween the two, go with HOG + Linear SVM.
Finally, make sure you try all three detectors before you decide!
Gather a few example images and test out the face detectors.
Let your empirical results guide you — apply face detection using each of the algorithms, examine the results, and double-down on the algorithm that gave you the best results.
Step #3: Discover Facial Landmarks (Intermediate)
At this point you can detect the location of a face in an image.
But what if we wanted to localize various facial structures, including:
Nose
Eyes
Mouth
Jawline
Using facial landmarkswe can do exactly that!
And best of all, facial landmark algorithms are capable of running in real-time!
Most of your computation is going to be spent detectingthe actual face — once you have the face detected, facial landmarks are quite fast!
Start by reading the following tutorials to learn how localize facial structures on a detected face:
You can then take the dataset you created and proceed to the next step to build your actual face recognition system.
Note: If you don’t want to build your own dataset you can proceed immediately to Step #6 — I’ve provided my own personal example datasets for the tutorials in Step #6 so you can continue to learn how to apply face recognition even if you don’t gather your own images.
Step #6: Face Recognition (Intermediate)
At this point you have either (1) created your own face recognition dataset using the previous step or (2) elected to use my own example datasets I put together for the face recognition tutorials.
To build your first face recognition system, follow this guide:
You’ll note that this tutorial does not rely on the dlib and face_recognition libraries — instead, we use OpenCV’s FaceNet model.
A great project for youwould be to:
ReplaceOpenCV’s FaceNet model with the dlib and face_recognition packages.
Extractthe 128-d facial embeddings
Traina Logistic Regression or Support Vector Machine (SVM) on the embeddings extracted by dlib/face_recognition
Take your time whewn implementing the above project — it will be a great learning experience for you.
Step #7: Improve Your Face Recognition Accuracy (Intermediate)
Whenever I write about face recognition the #1 question I get asked is:
“How can I improve my face recognition accuracy?”
I’m glad you asked — and in fact, I’ve already covered the topic.
Make sure you refer to the Drawbacks, limitations, and how to obtain higher face recognition accuracy section (right before the Summary) of the following tutorial:
Inside that section I discuss how you can improve your face recognition accuracy.
Step #8: Detect Fake Faces and Perform Anti-Face Spoofing
You may have noticed that it’s possible to “trick” and “fool” your face recognition system by holding up a printed photo of a person or photo of the person on your screen.
In those situations your face recognition correctlyrecognizes the person, but fails to realize that it’s a fake/spoofedface!
The PyImageSearch Gurus course includes additional modules and lessons on face recognition.
Additionally, you’ll also find:
Anactionable, real-world courseon OpenCV and computer vision (similar to a college survey course on Computer Vision but muchmore hands-on and practical).
The most comprehensive computer vision education online today.The PyImageSearch Gurus course covers13 modulesbroken out into168 lessons, with other2,161 pagesof content. You won’t find a more detailed computer vision course anywhere else online, I guarantee it.
A community of like-minded developers, researchers, and studentsjust like you, who are eager to learn computer vision and level-up their skills.
To learn more about the PyImageSearch Gurus course, just use the link below:
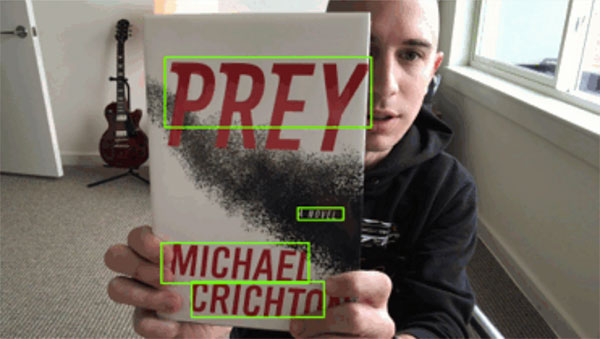
One of the first applications of Computer Vision was Optical Character Recognition (OCR).
OCR algorithms seek to (1) take an input image and then (2) recognize the text/charactersin the image, returning a human-readable string to the user (in this case a “string” is assumed to be a variable containing the text that was recognized).
While OCR is a simple concept to comprehend (input image in, human-readable text out) it’s actually extremely challenging problem that is far from solved.
The steps in this section will arm you with the knowledge you need to build your own OCR pipelines.
Step #1: Install OpenCV (Beginner)
Before you can apply OCR to your own projects you first need to install OpenCV.
Follow Step #1 of theHow Do I Get Started?section above to install OpenCV on your system.
Once you have OpenCV installed you can move on to Step #2.
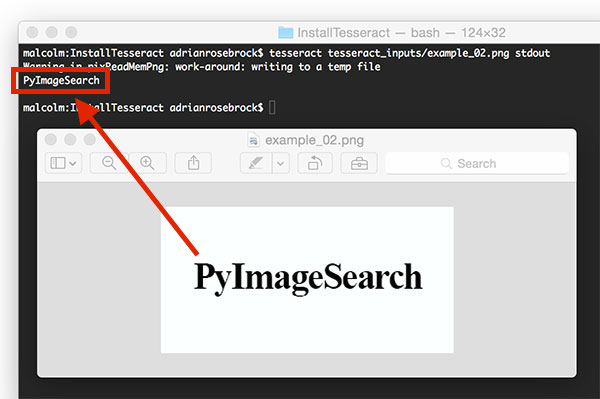
Step #2: Discover Tesseract for OCR (Beginner)
Tesseract is an OCR engine/API that was originally developed by Hewlett-Packard in the 1980s.
The library was open-sourced in 2005 and later adopted by Google in 2006.
Tesseract supports over 100 written languages, ranging from English to to Punjabi to Yiddish.
Combining OpenCV with Tesseract is by farthe fastest way to get started with OCR.
First, make sure you Tesseract installed on your system:
Again, follow the guides and practice with them — they will help you learn how to apply OCR to your tasks.
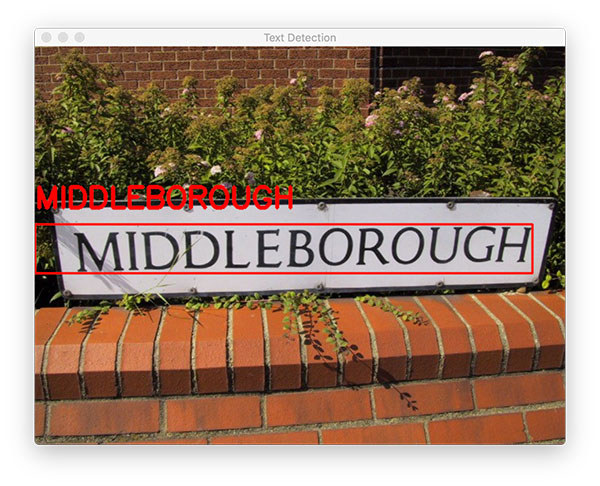
Step #5: Text Detection in Natural Scenes (Intermediate)
So far we’ve applied OCR to images that were captured under controlled environments(i.e., no major changes in lighting, viewpoint, etc.).
But what if we wanted to apply OCR to images in uncontrolled environments?
Imagine we were tasked with building a Computer Vision system for Facebook to handle OCR’ing the 350+ million new images uploaded to their new system.
In that we case, we can make zero assumptionsregarding the environment in which the images were captured.
Some images may be captured using a high quality DSLR camera, others with a standard iPhone camera, and even others with a decade old flip phone — again, we can make no assumptionsregarding the quality, viewing angle, or even contents of the image.
In that case, we need to break OCR into a two stage process:
Stage #1:Use the EAST Deep Learning-based text detector to locate wheretext resides in the input image.
Stage #2: Use an OCR engine (ex., Tesseract) to take the text locations and then actually recognizethe text itself.
To perform Stage #1 (Text Detection) you should follow this tutorial:
If you’ve read the Face Applicationssection above you’ll note that our OCR pipeline is similar to our face recognition pipeline:
First, wedetect the textin the input image (akin to to detecting/locating a face in an image)
And then we take the regions of the image that contain the text, and then actually recognize it(which is similar to taking the location of a face and then actually recognizingwho is in the face).
Step #6: Combine Text Detection with OCR (Advanced)
Now that we know wherein the input image text resides, we can then take those text locations and actually recognize the text.
To accomplish this task we’ll again be using Tesseract, but this time we’ll want to use Tesseract v4.
The v4 release of Tesseract contains a LSTM-based OCR engine that is far more accuratethan previous releases.
You can learn how to combine Text Detection with OCR using Tesseract v4 here:
While the Google Vision API requires (1) an internet connection and (2) payment to utilize, in my opinion it’s one of the bestOCR engines available to you.
OCR is undoubtedly one of the most challengingareas of Computer Vision.
If you need help building your own custom OCR systemsor increasing the accuracy of your current OCR system,, I would recommend joining thePyImageSearch Gurus course.
The course includes private forums where I hang out and answer questions daily.
It’s a great place to get expert advice, both from me, as well as the more advanced students in the course.
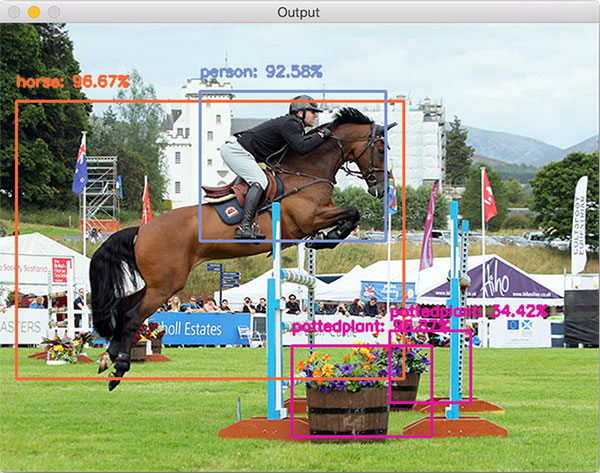
Object detection algorithms seek to detect the locationof where an object resides in an image.
These algorithms can be as simple as basic color thresholding or as advanced as training a complex deep neural network from scratch.
In the first part of this section we’ll look at some basic methods of object detection, working all the way up to Deep Learning-based object detectors including YOLO and SSDs.
Step #1: Configure Your Development Environment (Beginner)
Prior to working with object detection you’ll need to configure your development environment.
Install Keras and TensorFlow via Step #1 of the Deep Learningsection.
Provided you have OpenCV, TensorFlow, and Keras installed, you are free to continue with the rest of this tutorial.
Step #2: Create a Basic Object Detector/Tracker (Beginner)
We’ll keep our first object detector/tracker super simple.
We’ll rely strictly on basic image processing concepts, namely color thresholding.
To apply color threshold we define an upperand lowerrange in a given color space (such as RGB, HSV, L*a*b*, etc.)
Then, for an incoming image/frame, we use OpenCV’scv2.inRange function to apply color thresholding, yielding a mask, where:
All foregroundpixels are white
And all background pixels are black
Therefore, all pixels that fall into our upper and lower boundaries will be marked as foreground.
Color thresholding methods, as the name suggestions, are super useful when you know the color of the object you want to detect and track will be differentthan all other colors in the frame.
Furthermore, color thresholding algorithms are very fast, enabling them to run in super real-time, even on resource constrained devices, such as the Raspberry Pi.
Let’s go ahead and implement your first object detector now:
Once you’ve implemented the above two guides I suggest you extend the project by attempting to track your own objects.
Again, keep in mind that this object detector is based on color, so make sure the object you want to detect has a different color than the other objects/background in the scene!
Step #3: Basic Person Detection (Beginner)
Color-based object detectors are fast and efficient, but they do nothing to understand the semantic contents of an image.
For example, how would you go about defining a color range to detect an actual person?
Would you attempt to track based on skin tone?
That would fail pretty quickly — humans have a large variety of skin tones, ranging from ethnicity, to exposure to the sun. Defining such a range would be impossible.
Would clothing work?
Well, maybe if you were at a soccer/football game and wanted to track players on the pitch via their jersey colors.
But for general purpose applications that wouldn’t work either — clothing comes in all shapes, sizes, colors, and designs.
I think you get my point here — trying to detect a person based on color thresholding methods alone simply isn’t going to work.
Instead, you need to use a dedicated object detection algorithm.
One of the most common object detectors is the Viola-Jones algorithm, also known asHaar cascades.
The Viola-Jones algorithm was published back in 2001 but is still used today (although Deep Learning-based object detectors obtain far better accuracy).
Now that we’ve seen how HOG + Linear SVM works in practice, let’s dissect the algorithm a bit.
To start, the HOG + Linear SMV object detectors uses a combination of sliding windows, HOG features, and a Support Vector Machine to localize objects in images.
Image pyramids allow us to detect objects at different scales (i.e., objects that are closer to the camera as well as objects farther away):
Finally, you need to understand the concept of non-maxima suppression, a technique used in bothtraditional object detection as well as Deep Learning-based object detection:
When performing object detection you’ll end up locating multiplebounding boxes surrounding a single object.
This behavior is actually a good thing— it implies that your object detector is working correctly and is “activating” when it gets close to objects it was trained to detect.
The problem is that we now have multiple bounding boxes for oneobject.
To rectify the problem we can apply non-maxima suppression, which as the name suggestions, suppresses (i.e., ignores/deletes) weak, overlapping bounding boxes.
The term “weak” here is used to indicate bounding boxes of low confidence/probability.
If you are interested in learning more about the HOG + Linear SVM object detector, including:
How totrain your own custom HOG + Linear SVM object detector
The inner-workings of the HOG + Linear SVM detector
Inside the course you’ll find 30+ lessons on HOG feature extraction and the HOG + Linear SVM object detection algorithm.
Step #5: Your First Deep Learning Object Detector (Intermediate)
For ~10 years HOG + Linear SVM (including its variants) was considered the state-of-the-art in terms of object detection.
However, Deep Learning-based object detectors, including Faster R-CNN, Single Shot Detector (SSDs), You Only Look Once (YOLO), and RetinaNethave obtained unprecedented object detection accuracy.
The OpenCV library is compatible with a number of pre-trained object detectors — let’s start by taking a look at this SSD:
Step #7: Deep Learning Object Detectors (Intermediate)
For a deeper dive into Deep Learning-based object detection, including how tofilter/remove classes that you want to ignore/not detect, refer to this tutorial:
The YOLO object detector is designed to be super fast; however, it appears that the OpenCV implementation is actually far slowerthan the SSD counterparts.
I’m not entirely sure why that is.
Furthermore, OpenCV’s Deep Neural Network (dnn ) module does not yet support NVIDIA GPUs, meaning that you cannot use your GPU to improve inference speed.
OpenCV is reportedly working on NVIDIA GPU support but it may not be until 2020 until that support is available.
Step #8: Evaluate Deep Learning Object Detector Performance (Intermediate)
If you decide you want to train your own custom object detectors from scratch you’ll need a method to evaluate the accuracy of the model.
To do that we use two metrics: Intersection over Union (IoU)and mean Average Precision (mAP)— you can read about them here:
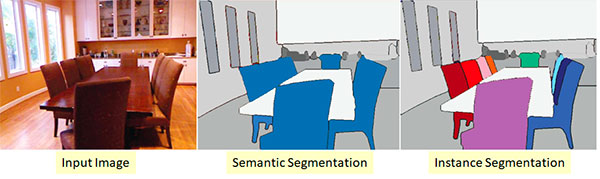
Step #9: From Object Detection to Semantic/Instance Segmentation (Intermediate)
If you’ve followed along so far, you know that object detection produces bounding boxesthat report the locationand class labelof each detected object in an image.
But what if you wanted to extend object detection to produce pixel-wise masks?
These masks would not only report the bounding box location of each object, but would report which individual pixels belong to the object.
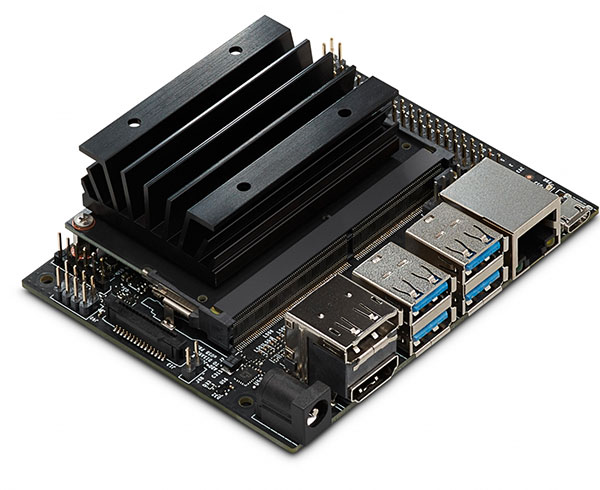
Step #10: Object Detection on Embedded Devices (Advanced)
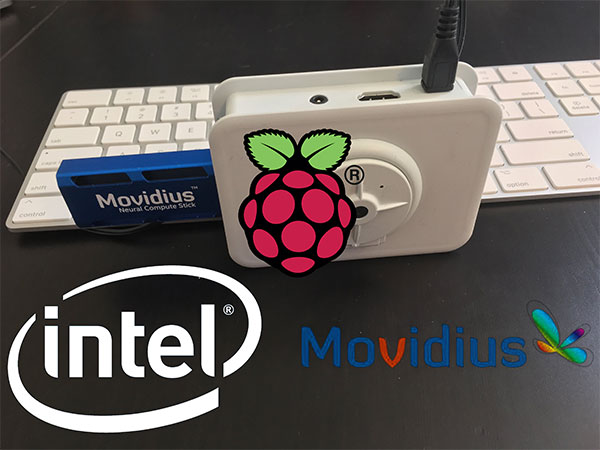
Deep Learning-based object detectors, while accurate, are extremelycomputationally hungry, making them incredibly challenging to apply them to resource constrained devices such as the Raspberry Pi, Google Coral, and NVIDIA Jetson Nano.
As the name suggestions, this book is dedicated to developing and optimizing Computer Vision and Deep Learning algorithms on resource constrained devices, including the:
Raspberry Pi
Google Coral
Intel Movidius NCS
NVIDIA Jetson Nano
Inside you’ll learn how to train your own object detectors, optimize/convert them for the RPi, Coral, NCS, and/or Nano, and then run the detectors in real-time!
Object Tracking
Object Tracking algorithms are typically applied afterand object has already been detected; therefore, I recommend you read the Object Detectionsection first. Once you’ve read those sets of tutorials, come back here and learn about object tracking.
Object detection algorithms tend to be accurate, but computationally expensive to run.
It may be infeasible/impossible to run a given object detector on everyframe of an incoming video stream and stillmaintain real-time performance.
Therefore, we need an intermediary algorithm that can accept the bounding box location of an object, track it, and then automatically update itselfas the object moves about the frame.
We’ll learn about these types of object tracking algorithms in this section.
Step #1: Install OpenCV on Your System (Beginner)
Prior to working through this section you’ll need to install OpenCV on your system.
Make sure you follow Step #1 of How Do I Get Started?to configure and install OpenCV.
Additionally, I recommend reading the Object Detectionsection first as object detection tends to be a prerequisite to object tracking.
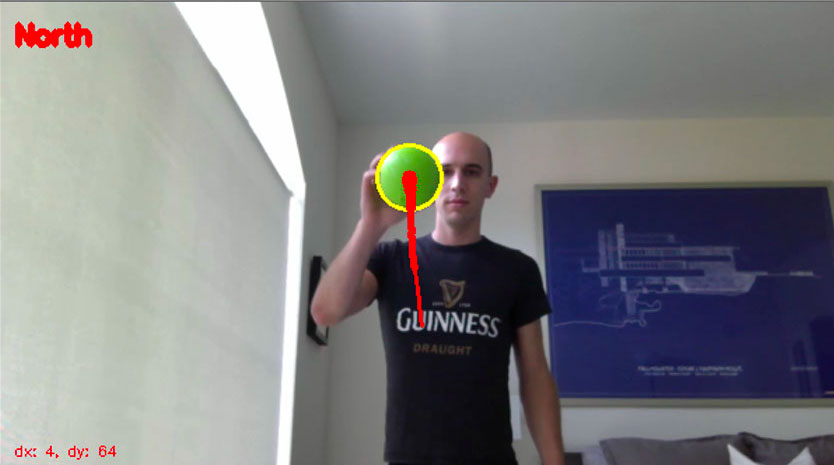
Step #2: Your First Object Tracker (Beginner)
The first object tracker we’ll cover is a color-based tracker.
This algorithm combines bothobject detection and tracking into a single step, and in fact, is the simplestobject tracker possible.
You can read more about color-based detection and tracking here:
Our color-based tracker was a good start, but the algorithm will fail if there is more than one object we want to track.
For example, let’s assume there are multiple objectsin our video stream and we want to associate unique IDs with each of them— how might we go about doing that?
The answer is to apply aCentroid Trackingalgorithm:
Using Centroid Tracking we can not only associate unique IDs with a given object, but also detect when an object is lost and/or has left the field of view.
Multi-object tracking is, by definition, significantly more complex, both in terms of the underlying programming, API calls, and computationally efficiency.
Most multi-object tracking implementations instantiate a brand new Python/OpenCV class to handle object tracking, meaning that if you have Nobjects you want to track, you therefore have Nobject trackers instantiated — which quickly becomes a problem in crowded scenes.
Your CPU will choke on the load and your object tracking system will come to a grinding halt.
One way to overcome this problem is to use multiprocessinganddistribute the load across multiple processes/cores,thus enabling you to reclaim some speed:
Step #6: Applied Object Tracking and Counting (Intermediate)
So far you’ve learned how to apply single object tracking and multi-object tracking.
Let’s put all the pieces together and build a person/footfall counter applicationcapable of detecting, tracking, and counting the number of people that enter/exit a given area (i.e., convenience store, grocery store, etc.):
In particular, you’ll want to note how the above implementation takes a hybrid approach to object detection and tracking, where:
The object detector is only applied every Nframes.
One object tracker is created per detected object.
The trackers enable us to track the objects.
Then, once we reach the N-th frame, we apply object detection, associate centroids, and then create new object trackers.
Such a hybrid implementation enables us to balance speedwith accuracy.
Where to Next?
Object tracking algorithms are more of an advanced Computer Vision concept.
If you’re interested in studying Computer Vision in more detail, I would recommend the PyImageSearch Gurus course.
This course is similar to a college survey in Computer Vision, but waymore practical, including hands-on coding and implementations.
Instance Segmentation and Semantic Segmentation
There are three primary types of algorithms used for image understanding:
Image classificationalgorithms enable you to obtain a single labelthat represents the contents of an image. You can think of image classification as inputting a single image to a network and obtaining a single labelas output.
Object detection algorithms are capable of telling you not only what is in an image, but also wherein the image a given object is. Object detectors thus accept a single input image and then returning multiple valuesas an output. The output itself is a list of values containing (1) the class label and (2) the bounding box (x, y)-coordinates of where the particular object is in the image.
Instance segmentation and semantic segmentation take object detection farther. Instead of returning bounding box coordinates, instance/semantic segmentation methods instead yield pixel-wise masksthat tell us (1) the class label of an object, (2) the bounding box coordinates of the object, and (3)the coordinates of the pixels that belong to the object.
These segmentation algorithms are intermediate/advanced techniques, so make sure you read the Deep Learningsection above to ensure you understand the fundamentals.
Step #1: Configure Your Development Environment (Beginner)
In order to perform instance segmentation you need to have OpenCV, TensorFlow, andKerasinstalled on your system.
Make sure you follow Step #1 from the How Do I Get Started?section to install OpenCV.
From there, follow Step #1 from the Deep Learningsection to ensure TensorFlow and Keras are properly configured.
Step #2: Segmentation vs. Object Detection (Intermediate)
Now that you have your deep learning machine configured, you can learn about instance segmentation.
Follow this guide to utilize your first instance segmentation network using OpenCV:
That guide will also teach you how instance segmentation is different from object detection.
Step #3: Applying Mask R-CNN (Intermediate)
Mask R-CNN is arguably the most popularinstance segmentation architecture.
Mask R-CNNs have been successfully applied to self-driving cars (vehicle, road, and pedestrian detection), medical applications (automatic tumor detection/segmentation), and much more!
This guide will show you how to use Mask R-CNN with OpenCV:
Step #4: Semantic Segmentation with OpenCV (Intermediate)
When performing instance segmentationour goal is to (1) detect objects and then (2) compute pixel-wise masks for each object detected.
Semantic segmentation is a bit different — instead of labeling justthe objects in an input image, semantic segmentation seeks tolabel every pixelin the image.
That means that if a given pixel doesn’t belong to any category/class, we label it as“background”(meaning that the pixel does not belong to any semantically interesting object).
Semantic segmentation algorithms are very popularforself-driving car applicationsas they can segment an input image/frame into components, including road, sidewalk, pedestrian, bicyclist, sky, building, background, etc.
To learn more about semantic segmentation algorithms, refer to this tutorial:
Applying Computer Vision and Deep Learning algorithms to resource constrained devices such as the Raspberry Pi, Google Coral, and NVIDIA Jetson Nano can be super challengingdue to the fact that state-of-the-art CV/DL algorithms are computationally hungry — these resource constrained devices just don’t have enough CPU power and sufficient RAM to feed these hungry algorithm beasts.
But don’t worry!
You can still apply CV and DL to these devices — you just need to follow these guides first.
Step #1: Configure Your Embedded/IoT Device (Beginner)
Before you start applying Computer Vision and Deep Learning to embedded/IoT applications you first need to choose a device.
I suggest starting with the Raspberry Pi— it’s a super cheap ($35) and easily accessible device for your initial forays into embedded/IoT Computer Vision and Deep Learning.
These guides will help you configure your Raspberry Pi:
If I’ve said it once, I’ve said it a hundred times — the best way to learn Computer Vision is through practical, hands-on the projects.
The same is true for Embedded Vision and IoT projects as well.
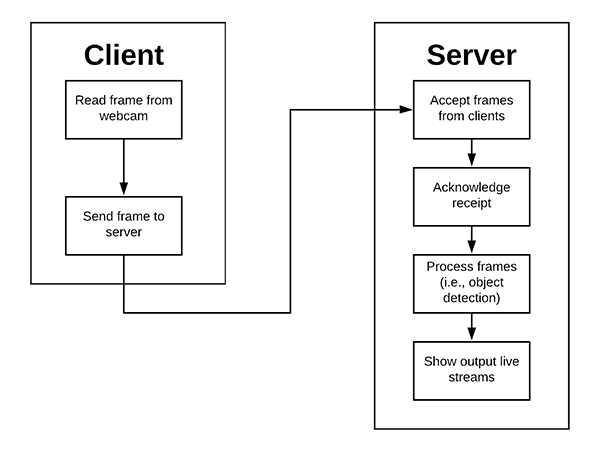
To gain additional experience building embedded CV projects, follow these guides to work with video on embedded devices, including working with multiple camerasand live streaming video over a network:
From there you’ll want to go through the steps in theDeep Learningsection.
Finally, if you want to integrate text message notifications into the Computer Visions security system we build in the previous step, then read this tutorial:
Step #4: Image Classification on Embedded Devices (Intermediate)
If you followed Step #3 then you found out that running Deep Learning models on resource constrained devices such as the Raspberry Pi can be computationally prohibitive, preventing you from obtaining real-time performance.
In order to boost your Frames Per Second (FPS) throughput rate, you should consider using a coprocessor such as Intel’s Movidius NCSor Google’s Coral USB Accelerator:
This book is your one-stop shopfor learning how to master Computer Vision and Deep Learning on embedded devices.
Computer Vision on the Raspberry Pi
At only $35, the Raspberry Pi (RPi) is a cheap, affordable piece of hardware that can be used by hobbyists, educators, and professionals/industry alike.
The Raspberry Pi 4 (the current model as of this writing) includes a Quad core Cortex-A72 running at 1.5Ghz and either 1GB, 2GB, or 4GB of RAM (depending on which model you purchase) — all running on a computer the size of a credit card.
But don’t let its small size fool you!
The Raspberry Pi can absolutelybe used for Computer Vision and Deep Learning (but you need to know how to tune your algorithms first).
Step #1: Install OpenCV on the Raspberry Pi (Beginner)
Prior to working through these steps I recommend that you first work through the How Do I Get Started? section first.
Not only will that section teach you how to install OpenCV on your Raspberry Pi, but it will also teach you the fundamentals of the OpenCV library.
If you find yourself struggling to get OpenCV installed on your Raspberry Pi, take a look at both:
Assuming you now have OpenCV installed on your RPi, you might be wondering about development best practices — what is the best way to write code on the RPi?
Should you install a dedicated IDE, such as PyCharm, directly on the Pi itself and code there?
Should you use a lightweight code editor such as Sublime Text?
Or should you SSH/VNC in to the RPi and edit the code that way?
You could potentiallydo all three of those, but my favorite is to use either PyCharm or Sublime Text on my laptop/desktop with a SFTP plugin:
Doing so enables me to code using my favorite IDE on my laptop/desktop.
Once I’m done editing a file, I save it, after which the file is automaticallyuploaded to the RPi.
It does take some additional time to configure your RPi and laptop/desktop in this manner, but once you do, it’s so worth it!
Step #3: Access your Raspberry Pi Camera or USB Webcam (Beginner)
Now that your development environment is configured, you should verify that you can access your camera, whether that be a USB webcamor the Raspberry Pi camera module:
Step #4: Your First Computer Vision App on the Raspberry Pi (Beginner)
The Raspberry Pi is naturally suited for home security applications, so let’s learn how we can utilize motion detectionto detect when there is an intruder in our home:
Step #5: OpenCV, GPIO, and the Raspberry Pi (Beginner)
If you want to use the GPIO to control additional hardware, specifically Hardware on Top (HATs), you should study how OpenCV and GPIO can be used together on the Raspberry Pi:
Step #6: Facial Applications on the Raspberry Pi (Intermediate)
Facial applications, including face recognitioncan be extremely tricky on the Raspberry Pi due to the limited computational horsepower.
Algorithms that worked well on our laptop/desktop may not translate well to our Raspberry Pi, so therefore, we need to take care to perform additional optimizations.
These tutorials will get you started applying facial applications on the RPi:
Step #7: Apply Deep Learning on the Raspberry Pi (Intermediate)
Deep Learning algorithms are notoriously computationally hungry, and given the resource constrained nature of the RPi, CPU and memory come at a premium.
To discover why Deep Learning algorithms are slow on the RPi, start by reading these tutorials:
That book will teach you how to use the RPi, Google Coral, Intel Movidius NCS, and NVIDIA Jetson Nano for embedded Computer Vision and Deep learning applications.
And just like all my tutorials, each chapter of the text includes well documented code and detailed walkthroughs, ensuring that you understand exactlywhat’s going on.
Computer Vision and Deep Learning algorithms have touched nearly every facet of Computer Science.
One area that CV and DL algorithms are making a massiveimpact on is the field of Medical Computer Vision.
Using Medical Computer Vision algorithms, we can now automatically analyze cell cultures, detect tumors, and even predict cancerbefore it even metastasizes!
Step #1: Configure Your Development Environment (Beginner)
Step #2 and #3 of this section will require that you have OpenCVconfigured and installed on your machine.
Make sure you follow Step #1 from the How Do I Get Started?section to install OpenCV.
Step #4 covers how to use Deep Learning for Medical Computer Vision.
You will need to have TensorFlowand Kerasinstalled on your system for those guides.
You should follow Step #1 from the Deep Learningsection to ensure TensorFlow and Keras are properly configured.
Step #2: Your First Medical Computer Vision Project (Beginner)
Our first Medical Computer Vision project uses only basic Computer Vision algorithms, thus demonstrating how even basic techniques can make a profoundimpact on the medical community:
Step #4: Solve Real-World Medical Computer Vision Projects (Advanced)
Our previous sections dealt with applying Deep Learning to a small medical image dataset.
But what about largermedical datasets?
Can we apply DL to those datasets as well?
You bet we can!
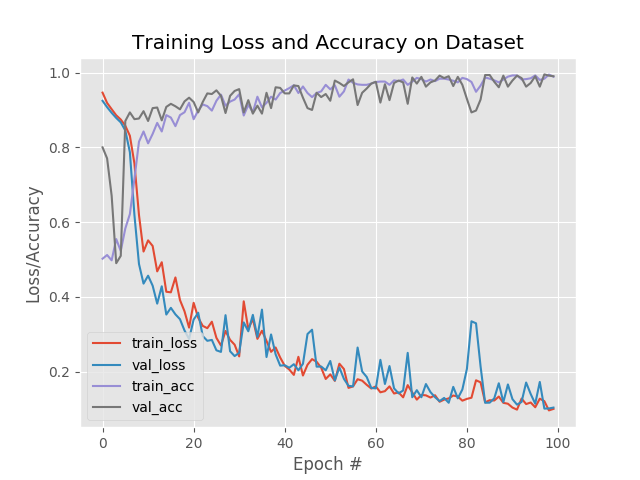
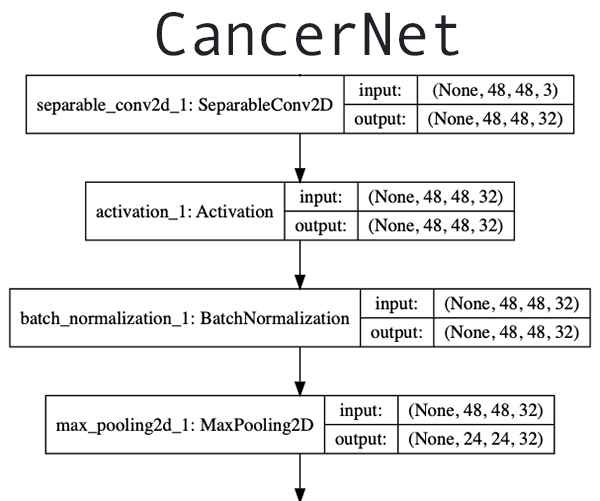
The following two guides will show you how to use Deep Learning to automatically classify malaria in blood cellsand perform automatic breast cancer detection:
Take your time working through those guides and make special note of how we compute the sensitivityand specificity, of the model — two key metricswhen working with medical imaging tasks that directlyimpact patients.
Where to Next?
As I mention in myAbout page, Medical Computer Vision is a topic near and dear to my heart.
Previously, my company has consulted with the National Cancer Institute and National Institute of Health to develop image processing and machine learning algorithms to automatically analyze breast histology images for cancer risk factors.
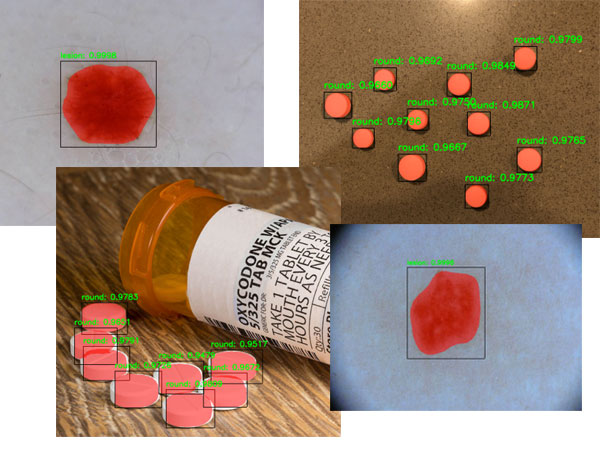
I’ve also developed methods to automaticallyrecognize prescription pills in images, thereby reducing the number of injuries and deaths that happen each year due to the incorrect medication being taken.
I continue to write about Medical Computer Vision, so if you’re interested in the topic, be sure to keep an eye on the PyImageSearch blog.
Once you’ve confirmed you can access the RPi camera module you can use theVideoStream class which is compatible with bothbuilt-in/USB webcams andthe RPi camera module:
Inevitably, there will be a time where OpenCV cannot access your camera and your script errors out, resulting in a “NoneType” error — this tutorial will help you diagnose and resolve such errors:
Face detection is a special class ofobject detection.
Object detectors can be trained to recognize just about any type of object.
The OpenCV library enables us to use pre-trained object detectorsto detect common objects we encounter in our daily lives (people, cars, trucks, dogs, cats, etc.).
The following tutorials will teach you how toapply object detection to video streams:
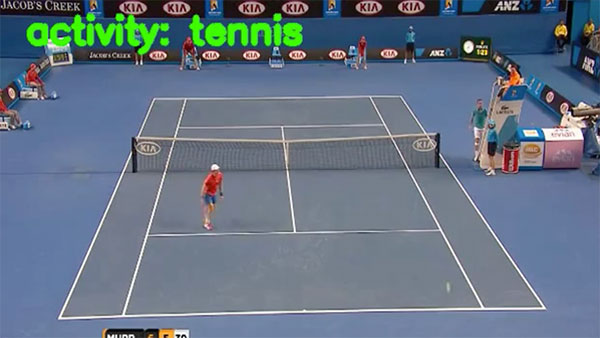
Step #8: Video Classification with Deep Learning (Advanced)
For this step I’ll be making the assumption that you’ve worked through the first half of the Deep Learningsection.
Provided that you have, you may have noticed that applying image classificationto video streamsresults in a sort of prediction flickering.
A “prediction flicker” occurs when an image classification model reports Label Afor Frame N, but then reports Label B(i.e., a different class label) for Frame N + 1(i.e., the next frame in the video stream), despite the frames having near-identical contents!
Prediction flickering is a natural phenomena in video classification.
It happens due to noise in the input frames confusing the classification model.
One simple method to rectify prediction flickering is to apply prediction averaging:
Using prediction averaging you can overcome the prediction flickering problem.
Additionally, you may want to look into more advanced Deep Learning-based image/video classifiers, including Recurrent Neural Networks (RNNs) and Long Short-Term Memory Networks (LSTMs).
Where to Next?
If you’re brand new to the world of Computer Vision and Image Processing, I would recommend you read Practical Python and OpenCV.
That book will teach you the basics of Computer Vision through the OpenCV library — and best of all, you can complete that book in only a single weekend.
It’s by farthe fastest way to get up and running with OpenCV.
And furthermore, the book includes complete code templates and examples for working with video files and live video streams with OpenCV.
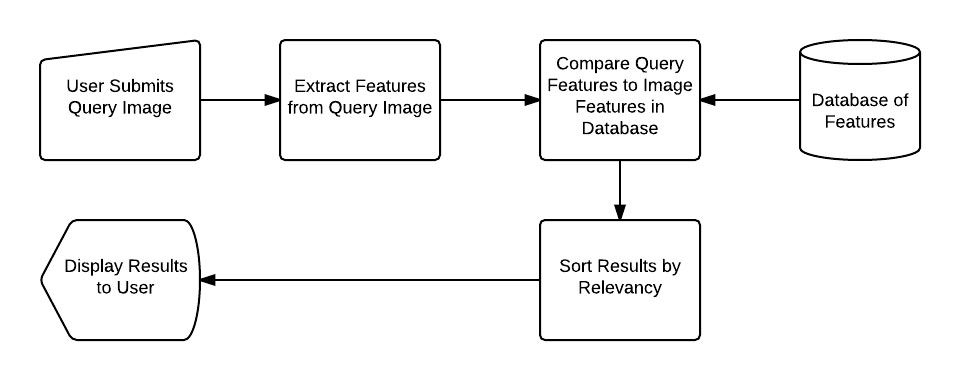
Content-based Image Retrieval (CBIR)is encompasses all algorithms, techniques, and methods to build an image search engine.
An image search engine functions similar to a text search engine (ex., Google, Bing, etc.).
A user visits the search engine website, but instead of having a text query (ex., “How do I learn OpenCV?”) they instead have an imageas a query.
The goal of the image search engine is to accept the query image and find all visually similarimages in a given dataset.
CBIR is the primary reason I started studying Computer Vision in the first place. I found the topic fascinating and am eager to share my knowledge with you.
Step #1: Install OpenCV on your System (Beginner)
Before you can perform CBIR or build your first image search engine, you first need to install OpenCV your system.
Follow Step #1 of the How Do I Get Started?section above to configure OpenCV and install it on your machine.
Step #2: Build Your First Image Search Engine (Beginner)
The first image search engine you’ll build is also one of the firsttutorials I wrote here on the PyImageSearch blog.
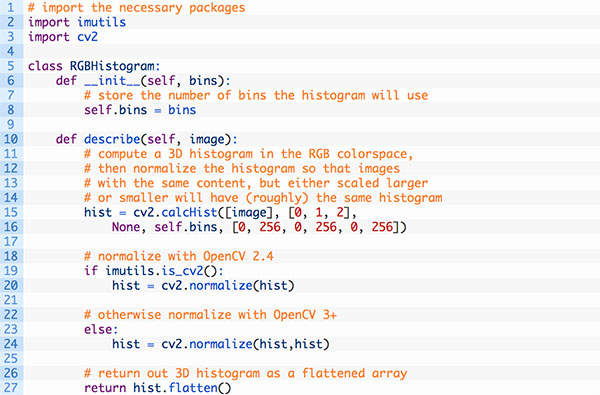
Using this tutorial you’ll learn how to search forvisually similarimages in a dataset using color histograms:
In Step #2 we built an image search engine that characterized the contents of an image based on color— but what if we wanted to quantify the image based on texture, shape, or some combination of all three?
How might we go about doing that?
In order to describe the contents of an image, we first need to understand the concept of image quantification:
As your CBIR system becomes more advanced you’ll start to include sub-steps between the main steps, but for now, understand that those four steps will be present in any image search engine you build.
In that case, you want want to find all duplicate/near-duplicate images in your dataset (as these duplicates provide no additional value to the dataset itself).
The techniques covered here will help you build your own basic image search engines.
The problem with these algorithms is they do not scale.
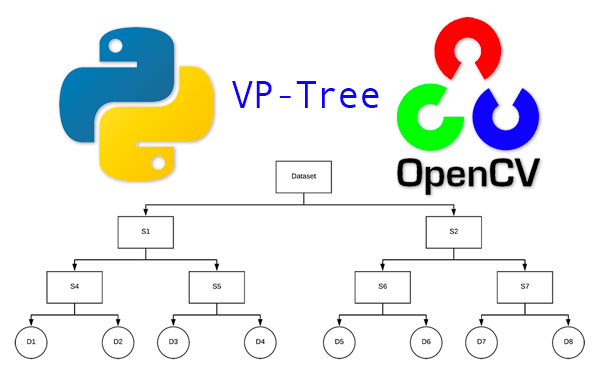
If you want to build more advanced image search engines that scale to millions of imagesyou’ll want to look into:
The Bag-of-Visual-Words model (BOVW)
k-Means clustering and forming a “codebook”
Vector quantization
Tf-idf weighting
Building an inverted index
The PyImageSearch Gurus courseincludes over 40+ lessons on building image search engines, including how to scale your CBIR system to millions of images.
If you’re interested in learning more about the course, and extending your own CBIR knowledge, just use the link below:
You can learn Computer Vision, Deep Learning, and OpenCV— I am absolutely confident in that.
And if you’ve been following this guide, you’ve seen for yourself how far you’ve progressed.
However, we cannot spend allof our time neck deep in code and implementation — we need to come up for air, rest, and recharge our batteries.
When then happens I suggest supplementing your technical education with a bit of light reading used to open your mind to what the world of Computer Vision and Deep Learning offers you.
After 5 years running the PyImageSearch blog I’ve seen countless readers dramatically change their lives, includingchanging their careersto CV/DL/AI, beingawarded funding, winning Kaggle competitions, and even becoming CTOs of funded companies!
It’s truly a privilege and an honor to be taking this journey with you — thank you for letting me accompany you on it.
Below you’ll find some of my favorite interviews, case studies, and success stories.
Step #1: A Day in the Life of Adrian Rosebrock (Beginner)
Ever wonder what it’s like to work as a Computer Vision/Deep Learning researcher and developer?
You’re not alone.
Over the past 5 years running PyImageSearch, I have received 100s of emails and inquiries that are “outside” traditional CV, DL, and OpenCV questions.
They instead focus on something much more personal — my daily life.
To give you an idea of what it’s like to be me, I’m giving you a behind the scenes look at:
How I spend my day.
What it’s like balancing my role as a (1) computer vision researcher/developer and (2) a writer and owner of PyImageSearch.
The habits and practices I’ve spent years perfecting to help me get shit done.
In the podcast we discuss Computer Vision, Deep Learning, and what the future holds for the fields.
I highly recommend listening to this podcast, regardless if you are brand new to Computer Vision or already a seasoned expert — it’s both entertaining and educational at the same time.
Step #4: From Developer to CTO (Beginner)
Saideep Talari’s story holds a special place in my heart.
David Austin and his teammate, Weimin Wang, took home 1st place (and $25,000) in Kaggle’s Iceberg Classifier Challenge (Kaggle’s most competitive challenge ever).
Step #7: Landing a Research and Development (R&D) Position (Beginner)
Kapil Varshney was recently hired at Esri R&D as a Data Scientist focusing on Computer Vision and Deep Learning.
Kapil’s story is really important as it shows that, no matter what your background is, you can be successful in computer vision and deep learning — you just need the right education first!
Soon after reading DL4CV, Kapil competed in a challenge sponsored by Esri to detect and localize objects in satellite images (including cars, swimming pools, etc.).
He finished in 3rd-place out of 53 competitors.
Esri was so impressed with Kapil’s work that after the contest they called him in for an interview.
Kapil nailed the interview and was hired full-time at Esri R&D.
His work on satellite image analysis at Esri now impacts millions of people across the world daily — and it’s truly a testament to his hard work.
I can’t promise you that you’ll win a Kaggle competition like David or become the CTO of a Computer Vision company like Saideep did, but I canguarantee you that the books and courses I offer here on PyImageSearch are the best resourcesavailable today to help you master computer vision and deep learning.
If you’d like to follow in their steps, you can see what books and courses I offer here:
In-depth dive into the world of computer vision and deep learning.
Whether this is the first time you’ve worked with machine learning and neural networks or you’re already a seasoned deep learning practitioner, DL4CV is engineered from the ground up to help you reach expert status.
안녕하세요 :) 금요일에 찬성님이 공유해주신 Full Stack Deep Learning Bootcamp 강의가 너무 좋아 바로 강의를 듣고 정리했습니다
단순히 Production할 때 Serving을 어떻게 해야한다 이런 한정적 내용만 가르쳐주지 않고, 프로젝트 전반에 대해 생각하면 좋은 점, 딥러닝 프로젝트 트러블 슈팅 및 자주 하는 실수(Shape mitmatch, Casting issue, OOM 등)을 알려주고 있어서 매우 유익합니다
큰 그림을 잘 그려주는 강의라 생각합니다 :)
관심있으신 분들은 보시면 후회하지 않으실 강의입니다!
---
부트캠프의 목적은 Production화하기 위한 모든 것들을 가르치는 것입니다 - Problem을 명확히하고 프로젝트의 cost를 측정 - Data를 찾고, 전처리하고, 라벨링 - 적절한 Framework와 Infra를 선정 - 학습의 reproducibility 관련 트러블슈팅 - 대규모 모델 Deploy https://www.facebook.com/groups/1738168866424224/permalink/2415463898694714/?sfnsn=mo
Do you want to build computer vision models for cattle monitoring? I the COCO json, masks, and images freely available here: https://nsmb.me/aw0f
I'm planning on sharing more, maybe writing tutorials if anybody is interested. Would love to get your feedback on this. 😊 https://www.facebook.com/groups/1738168866424224/permalink/2415463898694714/?sfnsn=mo
State of the art in Gait recognition: Novel AutoEncoder framework, GaitNet
https://www.profillic.com/paper/arxiv:1909.03051
"With extensive experiments on CASIA-B, USF, and FVG datasets, our method demonstrates superior performance to the SOTA quantitatively, the ability of feature disentanglement qualitatively, and promising computational efficiency." https://m.facebook.com/groups/1738168866424224?view=permalink&id=2414785935429177&sfnsn=mo
ICMYI: Breast Cancer Diagnosis with Transfer Learning and Global Pooling
https://www.profillic.com/paper/arxiv:1909.11839
(Breast cancer is one of the most common causes of cancer-related death in women worldwide)
(The proposed network architecture using a pre-trained Xception model yields 92.50% average classification accuracy) https://www.facebook.com/groups/1738168866424224/permalink/2414747192099718/?sfnsn=mo
아담은 고급 경사하강법들 중 대표주자 격이었습니다. 그런데, 몇주 전 아담을 개선한 RAdam(Rectified Adam)이 나왔고 이게 더 좋다며 들썩이고 있습니다. 가장 좋은 것이 개선되어 새로 나왔으니 새로운 대표주자의 탄생일까요?
옵티마이저는 SGD, 모멘텀, 알엠에스프롭 등의 순서로 발표되었는데 나중에 발표될 수록 앞서 나온것을 참조하게되므로 나중 것이 예전 것보다 성능이 개선되는 경향이 있습니다. 따라서 RAdam을 이해하기 위해서는 먼저 그동안 나온 옵티마이저들의 흐름을 파악해 보는 것이 좋습니다. 옵티마이저의 개선 방향과 그 끝에 나온 RAdam에 관하여 간단히 정리해 보았습니다.
1. 경사하강법을 개선한 SGD
딥러닝을 배울 때 반드시 배우게 되는 것이 경사 하강법(Gradient Decent, GD)입니다. 미분을 이용해 가중치를 업데이트 하는 것이지요. 그런데 경사 하강법은 한번 업데이트 할 때 마다 전체 데이터를 미분해야 하므로 계산량이 매우 많았습니다. 이러한 점을 보완하기 위해 전체 데이터가 아닌, 랜덤하게 추출한 일부만을 사용하는 확률적 경사 하강법(Stochastic GD, SGD)이 나왔습니다. SGD가 기존의 GD를 대체해 감과 동시에, 이처럼 기존의 방법을 개선한 '고급 경사하강법'들이 연이어 소개되기 시작합니다.
2. 관성과 방향을 고려한 모멘텀
미분을 통해 기울기를 구하는 건 같지만, 오차 수정전 바로 앞 수정값과 방향(+,-)를 참고하여 같은 방향으로 일정한 비율만 수정되게 하는 방법이 모멘텀(Momentum)입니다. 이 아이디어로 인해 양의 방향과 음의 방향으로 지그재그가 크게 반복되며 수정 되는 현상이 개선되었고 이전 이동값을 고려하여 일정 비율 만큼만 다음값을 결정하므로 관성의 효과를 낼 수 있었습니다.
3. 모멘텀을 개선한 네스테로프 모멘텀
모멘텀이 이동시킬 방향을 정하면, 그 방향으로 미리 이동해서 기울기를 계산, 불필요한 계산량을 줄이고 정확도를 향상시키는 방법이 제안 되었습니다. 네스테로프 모멘텀(Nesterov momentum)이라고 불리우는 고급 경사 하강법입니다.
4. 보폭의 크기를 개선한 아다그라드와 아다그라드를 개선한 알엠에스프롭
이어서 변수의 업데이트가 잦으면 학습률을 적게 하여 이동 보폭을 조절하는 아이디어를 담은 아다그라드(Adagrad)가 소개되었고, 이 아다그라드의 보폭 민감도를 보완한 알엠에스프롭(RMSprop)이 등장했습니다.
6. 모멘텀과 알엠에스 프롭의 장점을 합친 아담
아담은 모멘텀을 사용해 정확도를 향상시키고 알엠에스프롭를 이용해 보폭 민감도를 보완한 방법입니다. '결론은 아담'이었던 이유는 아담이 그동안 나온 고급 경사하강법들의 장점을 모아 만들어 졌기 때문입니다.
7. 그 아담을 개선한 RAdam
드디어 RAdam의 등장입니다. 일리노이즈 대학, 조지아텍 그리고 마이크로소프트에 소속된 멤버들이 아담을 연구하던 중, 초기에 낮은 학습률로 warmup을 해주거나, 모멘텀을 잠시 꺼주면 아담의 성능이 향상되는 이유를 조사했습니다. 이를 정리해 발표한 논문 (참고자료 2)에 등장한 것이 RAdam입니다.
아래 참고자료(3)은 RAdam의 원리에 대한 간단한 소개 및 Adam과의 결과를 비교하는 것을 보여줍니다. (수정/추가) 여기 실린 두개의 결과 그림을 가져와 첨부했었는데, RAdam의 loss가 Adam보다 더 낮지 않은 예시였고, 여러 데이터 집합의 결과를 검토해 한번 더 올리겠다고 예고된 바, RAdam 논문에 실린 그림으로 대체하였습니다.
참고 자료
1. 모두의 딥러닝, 길벗 (pp 116~119, "속도와 정확도 문제를 해결하는 고급 경사 하강법"편)
2. Liu, Liyuan, et al. "On the variance of the adaptive learning rate and beyond." arXiv preprint arXiv:1908.03265 (2019). https://arxiv.org/pdf/1908.03265.pdf
안녕하세요, 이번 포스팅에서는 2019년 10월 27일 ~ 11월 2일 우리나라 서울에서 개최될 ICCV 2019 학회의 accepted paper들에 대해 분석하여 시각화한 자료를 보여드리고, accepted paper 중에 제 관심사를 바탕으로 22편의 논문을 간단하게 리뷰를 할 예정입니다. 최근 모든 학회들이 다 그렇듯이 전체 accepted paper가 폭발적으로 많아지고 있습니다. 논문 수가 많다 보니 하나하나 읽기에는 시간이 많이 소요가 되어서 제목만 보고 논문 리스트를 추리게 되었습니다.
당부드리는 말씀은 제가 정리한 논문 리스트에 없다고 재미 없거나 추천하지 않는 논문은 절대 아니고 단지 제 주관에 의해 정리된 것임을 강조 드리고 싶습니다.!!
ICCV 2019 Paper Statistics
메이저 학회에 대한 미리보기 형식의 블로그 글들을 여러 편 썼는데 이번에는 5번째 글을 작성하게 되었습니다.
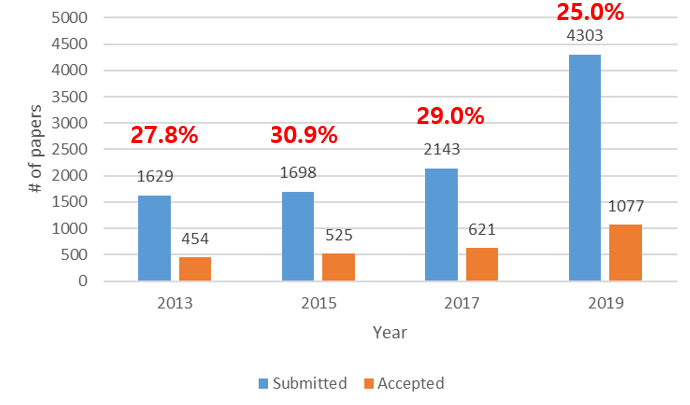
매번 하던 것처럼 이번에도 ICCV 2019에 몇 편의 논문이 submit되고 accept되는 지 경향을 시각화하였습니다.
[최근 6년간 ICCV acceptance rate]
격년으로 진행되어오는 학회인데 2017년까지만 해도 학회에 제출되는 논문의 규모가 약간씩 상승하는 경향을 보였습니다. 그런데 올해에는 2년전에 비해 제출된 논문의 수가 약 2배가량 커졌으며 이에 따라 acceptance rate도 25%대로 크게 떨어진 것을 확인할 수 있습니다. 이러한 경향은 CVPR 2019과도 거의 동일한 것이 흥미로운 점입니다. (2017년 대비 제출된 논문 2배 증가, acceptance rate 30% 25% 감소)
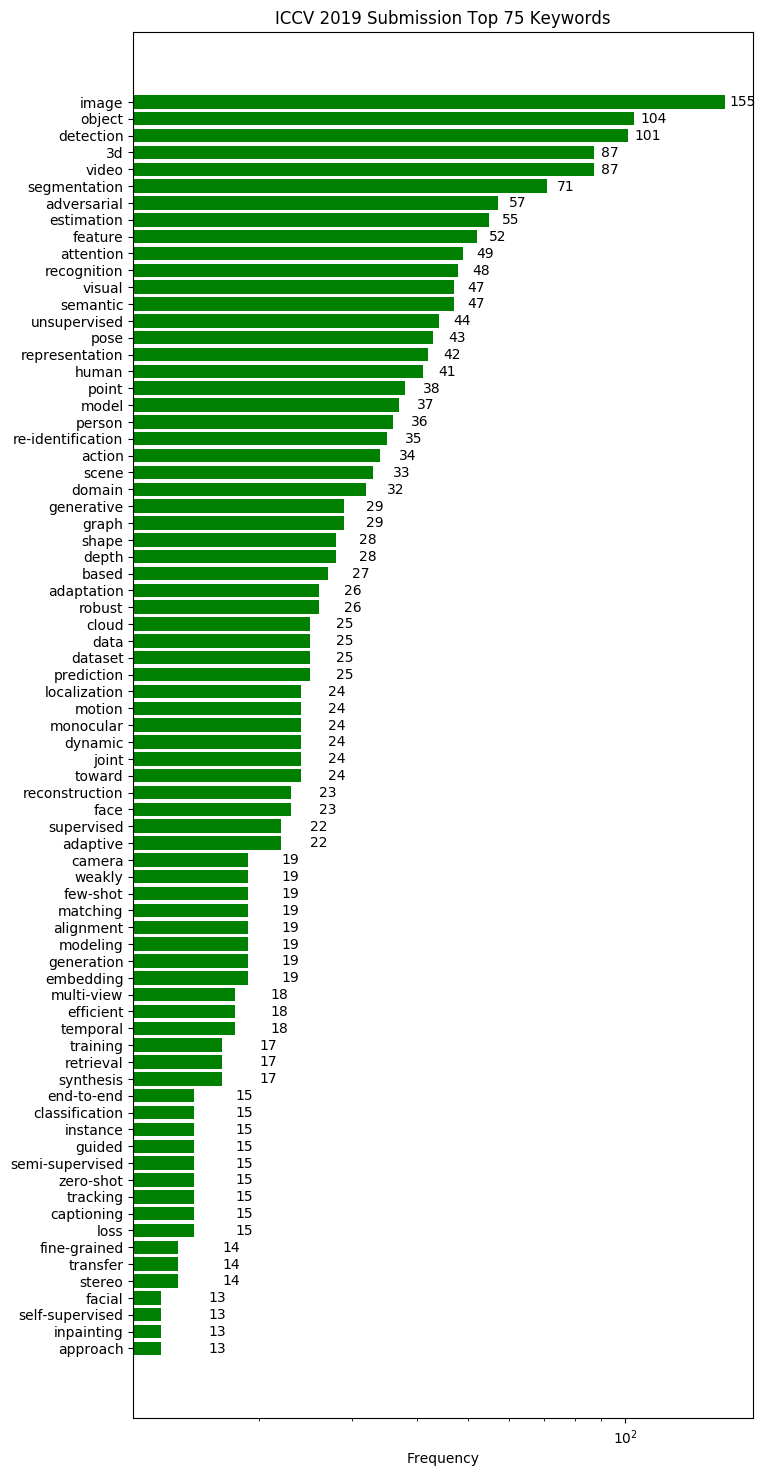
또한 어떤 키워드의 논문들이 많이 제출되는지 경향을 분석하기위해 간단한 python script를 작성해보았습니다.
단순하게 논문 제목에 포함된 키워드를 분석하여 시각화를 하였으며, 코드는 해당 repository 에서 확인하실 수 있습니다. (Star는 저에게 큰 힘이됩니다!)
[2019 ICCV top keywords]
Computer Vision 학회이다 보니 image, video, object 등 general한 키워드들이 주를 이루고 있고, attention, unsupervised, re-identification 등의 키워드를 가진 논문들이 빈도가 증가하였습니다. 이러한 키워드 정보를 참고하면 최근 학회에 제출되는 논문들의 트렌드를 파악하는데 도움이 될 수 있습니다.
참고로 올해는 총 1077편의 논문이 accept 되었고 저는 이 논문들 중 22편을 선정해서 간단하게 소개를 드릴 예정입니다.
ICCV 2019 주요 논문 소개
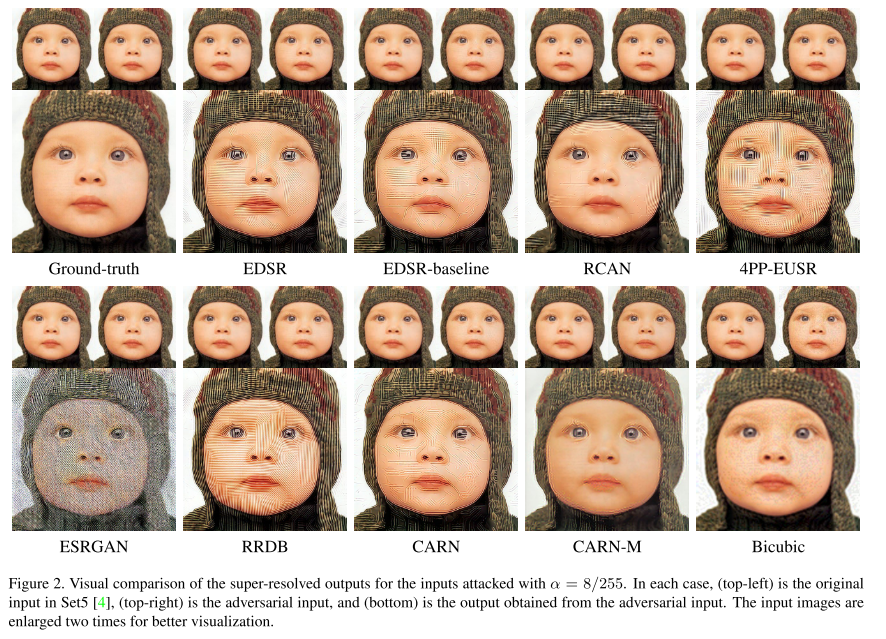
앞서 말씀드렸듯이 accept된 논문을 모두 다 확인하기엔 시간과 체력이 부족하여서, 간단하게 훑어보면서 재미가 있을 것 같은 논문들을 추려보았습니다. 총 22편의 논문이며, 8편의 oral paper, 14편의 poster paper로 준비를 해보았습니다. 각 논문에서 제안한 방법들을 그림과 함께 간략하게 소개드릴 예정이며, 논문의 디테일한 내용은 직접 논문을 읽어 보시는 것을 추천 드립니다.
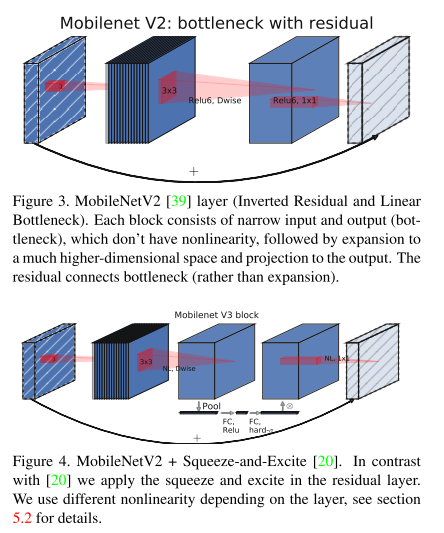
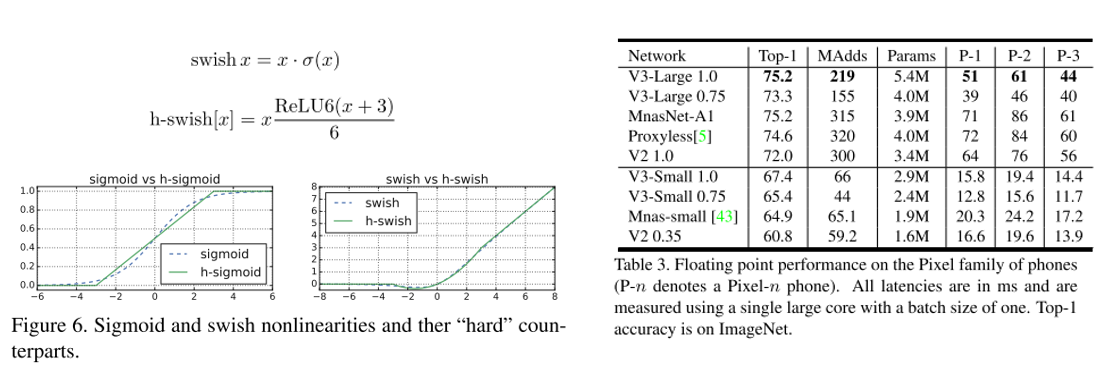
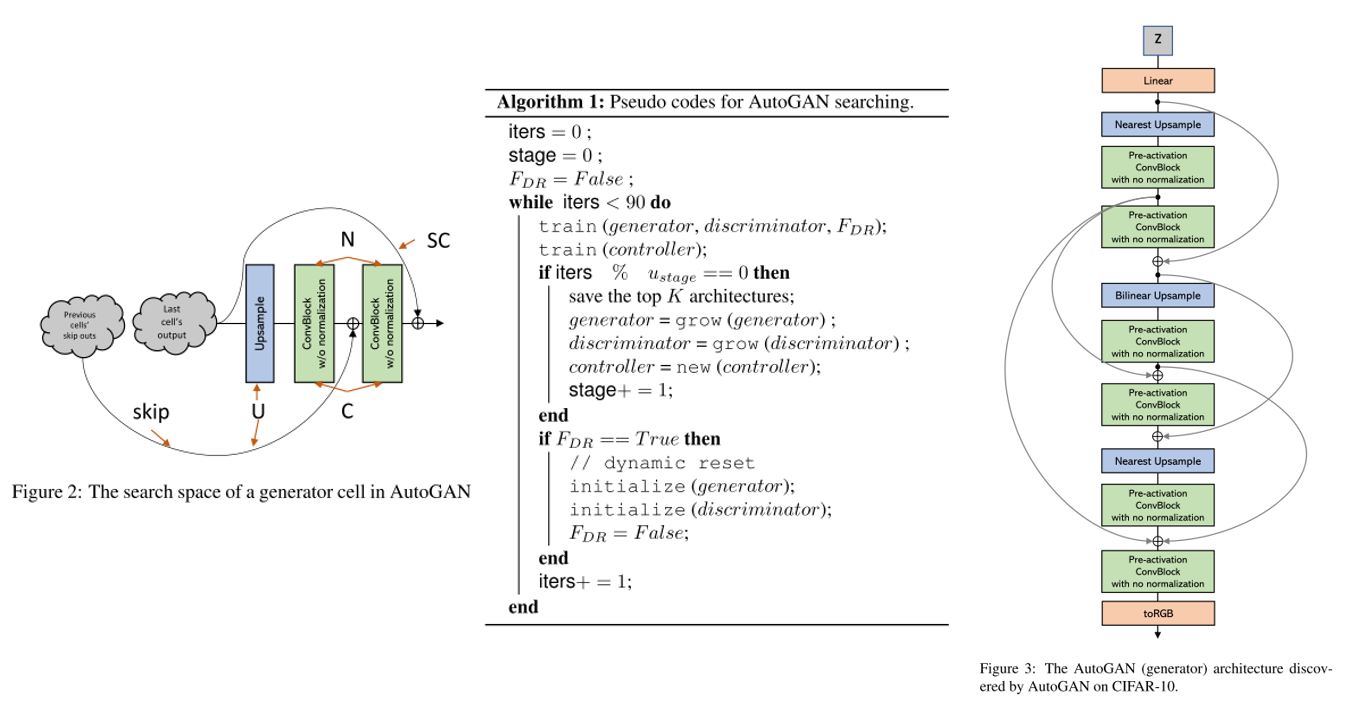
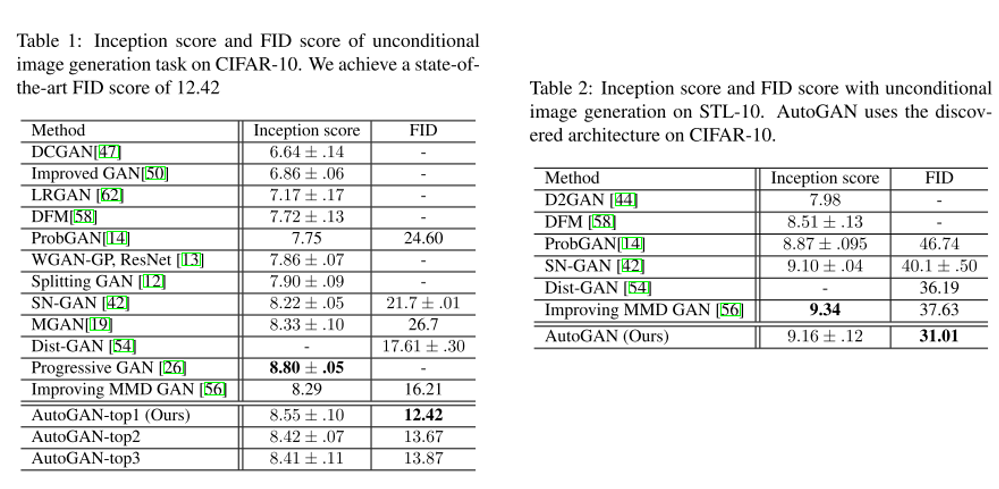
Efficient-Oriented CNN의 대표격인 MobileNet의 3번째 버전. MobileNet V2과 MnasNet 등에서 사용된 layer 들을 기반으로 한 구조를 제안하였고, swish nonlinearity를 fixed point 연산에 최적화시킨 hard-swish activation function을 제안함.
기존 방법들 대비 우수한 성능을 보였고, classification 외에 object detection, semantic segmentation에도 적용하면 좋은 성능을 보임. 또한 efficient segmentation을 위한 decoder 구조인 Lite Reduced Atrous Spatial Pyramid Pooling(LR-ASPP) 도 제안함.
기존 Slimmable network에서는 미리 지정한 width에 대해서만 동작할 수 있었는데 이러한 문제를 개선하여 임의의 width에서도 동작이 가능한 universally slimmable networks(US-Nets) 구조를 제안하였고, 이를 잘 학습시키기 위한 sandwich rule, inplace distillation 방식을 제안함.
Annotation이 존재하지 않는(Non-Curated Data) 대량의 데이터셋을 이용하여 ImageNet과같은curated data를 이용하여 pre-training을 하는 것과 비슷한 성능을 내기위한 unsupervised pre-training 기법을 제안함. Self-supervision, clustering이 주된 방법임.
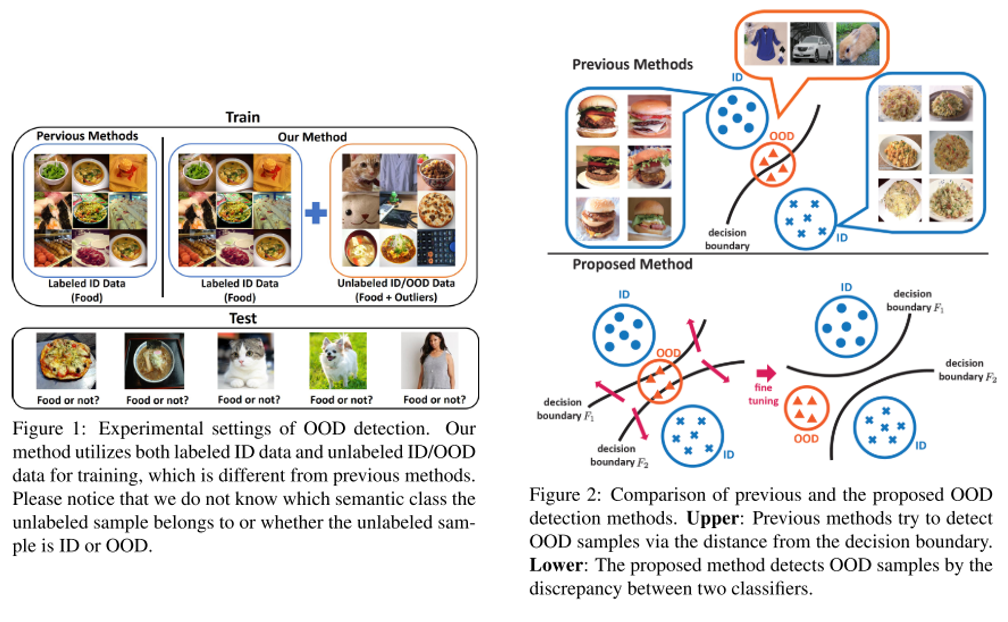
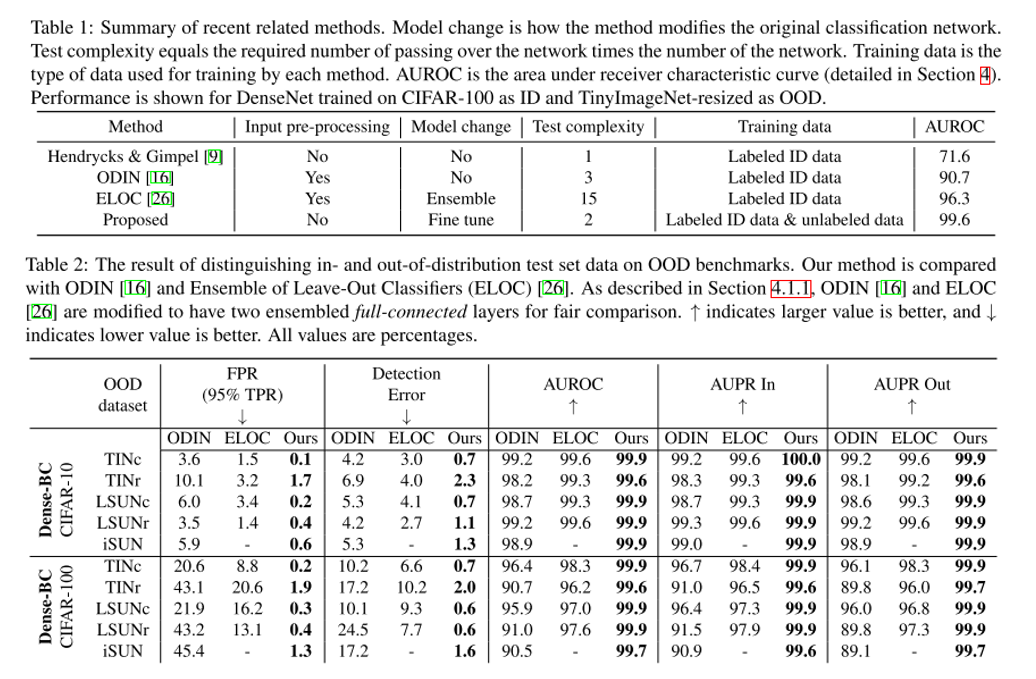
이미지 분류 문제에서 정해진 class 외에 아예 생뚱맞은 class의 이미지가 입력으로 들어왔을 때 이를 걸러내는 문제를 out-of-distribution detection 이라고 부름. 본 논문에서는 기존 방식들과는 다르게 unlabeled data를 활용하는 unsupervised setting을 따르며 기존 방식들 대비 우수한 성능을 보임.
하나의 feature extractor와 2개의 classifier로 구성이 되어있으며 각각 다른 decision boundary를 갖도록 하는 Discrepancy Loss 를 통해 unsupervised training을 수행함.
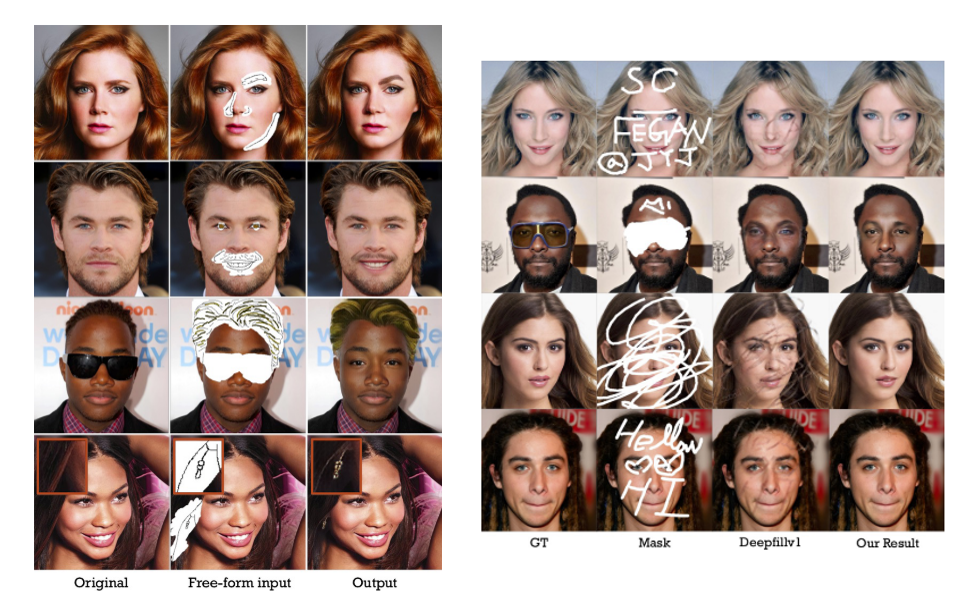
데모 이미지에서 알 수 있듯이 원하는 영역에 스케치를 그려주면 스케치와 주변 context를 보고 그럴싸한 이미지를 그려주는 GAN 구조를 제안함.
컬러 이미지, 수정하고자 하는 영역의 mask, HED edge detector를 이용하여 얻은 sketch 등을 이용하며, PartialConv based padding 과 per-pixel loss, perceptual loss, style loss, total variance loss 등을 이용하여 안정적인 학습을 수행함.
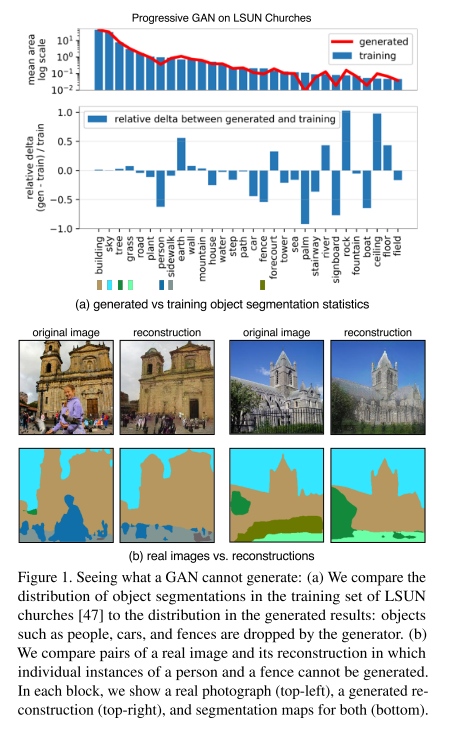
GAN의 고질적인 문제인 mode collapse를 분석하기 위해 distribution level 과 instance level에서 mode collapse를 시각화하는 방법을 제안함. 즉 GAN generator가 생성하지 못하는 것이 무엇인지를 파악하는 것을 목표로 함.
Target image와 generated image의 object들의 distribution을 확인하기 위해 semantic segmentation network를 사용하여 Generated Image Segmentation Statistics 지표를 측정하고, 이를 토대로 GAN을 분석함. (distribution level)
또한 이미지 단위로 특정 클래스가 누락된 GAN으로 생성한 이미지와 실제 이미지를 비교하며 실패 case를 분석하는 instance level의 분석도 수행함.
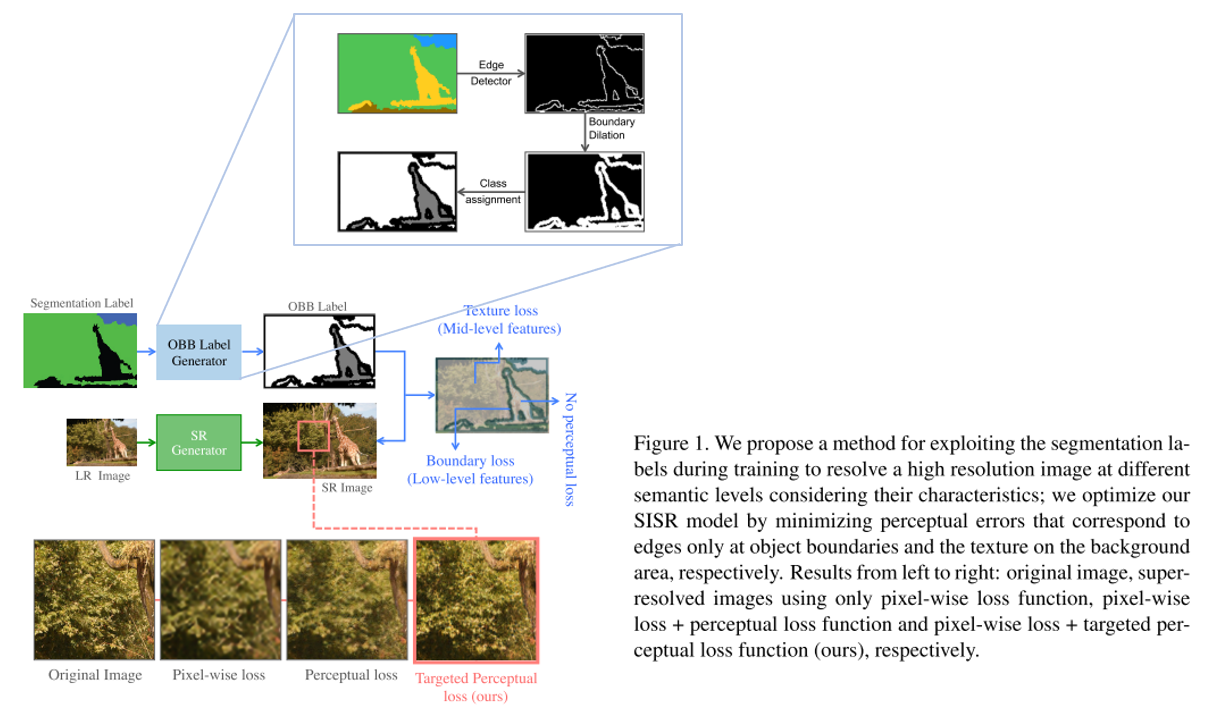
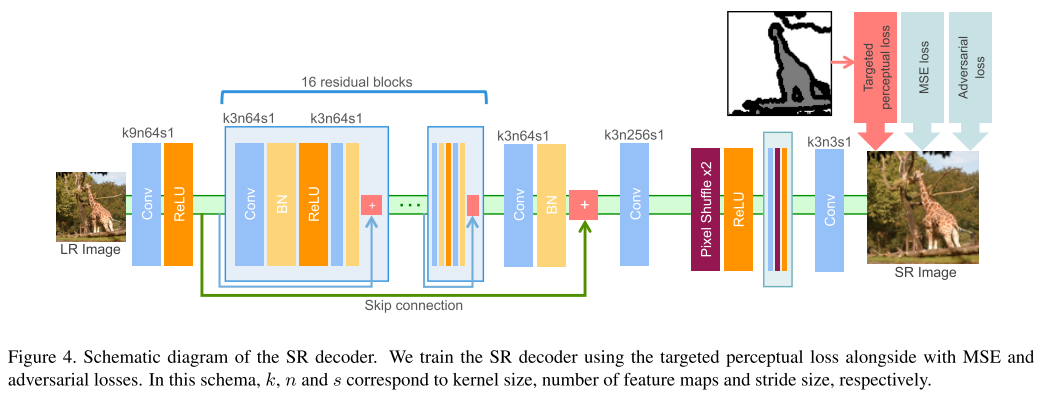
17번 논문과 유사하게 segmentation 정보를 사용하는 것이 특징이며 segmentation label로부터 Object, Background, Boundary(OBB) label을 얻은 뒤 이를 이용하여 perceptual loss를 효과적으로 주는 방법을 제안함.
실제로 사람이 민감하게 열화를 느끼는 edge 부분에 loss를 반영하는 점이 인상깊으며 실제 Super-Resolution을 통해 얻은 이미지의 퀄리티도 우수한 것을 확인할 수 있음.
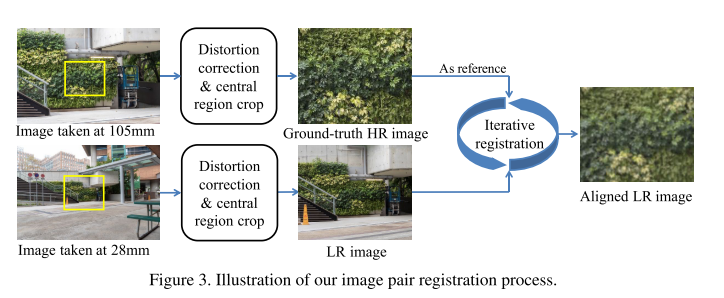
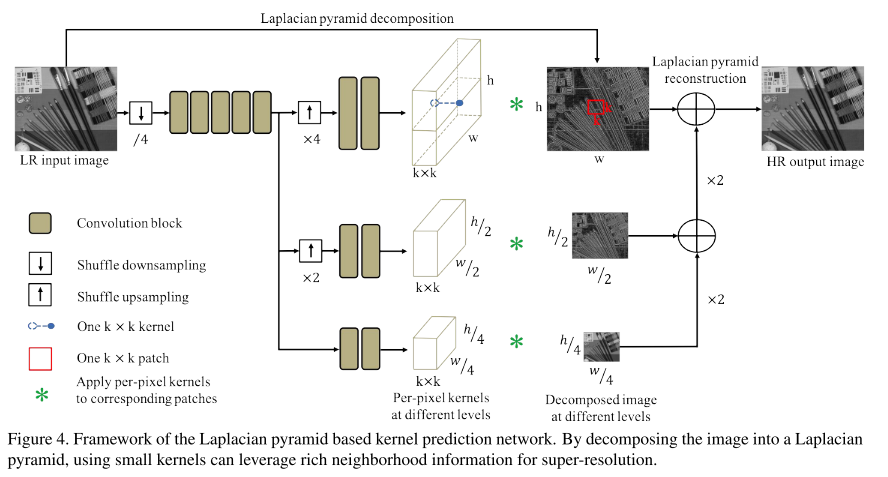
하지만 실제 LR image의 degradations은 단순한 bicubic downsampling 등의 방식보다 훨씬 복잡한 특징을 가지고 있음. 이러한 문제점을 해결하기 위해 디지털 카메라의 focal length를 조절하며 같은 scene에서 LR-HR pair image를 취득하여 얻은 RealSR 데이터셋을 제작하고, 새로운 모델인 Laplacian pyramid based kernel prediction network (LP-KPN) 을 제안함.
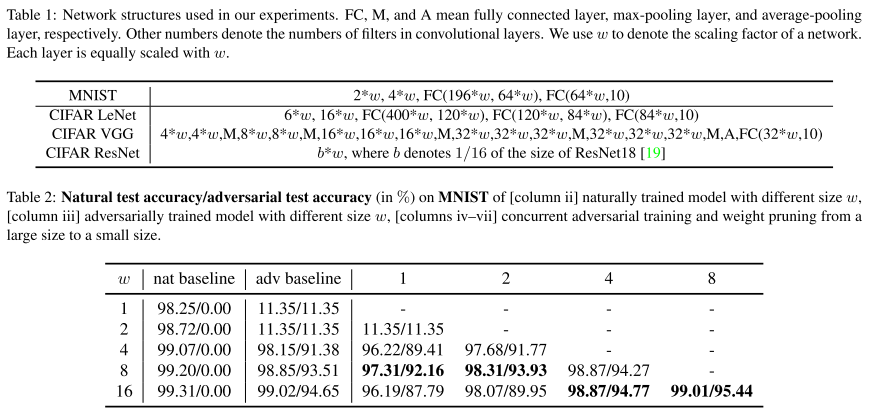
Topic: Adversarial attack, Model Compression, Network Pruning
Deep neural network가 adversarial attack에 취약한 건 잘 알려진 사실이며, Min-max robust optimization 기반 adversarial training을 이용하면 adversarial robustness를 높일 수 있음. 하지만 큰 capacity를 갖는 network를 필요로 함.
본 논문에서는 adversarial robustness를 유지하며 모델을 경량화하는 concurrent adversarial training & weight pruning 기법을 제안함.
[본 논문의 실험 셋팅 및 결과 요약]
결론
이번 포스팅에서는 ICCV 2019에 대한 분석 및 주요 논문 22편에 대한 간단한 리뷰를 글로 작성해보았습니다. 제가 정리한 논문 외에도 이번 ICCV 2019에는 양질의 논문들이 많이 제출되었으니 관심있으신 분들은 다른 논문들도 읽어 보시는 것을 권장 드리며 이상으로 글을 마치겠습니다. 감사합니다!
지난 9월 29일 일요일에 Neural Network Quantization & Compact Network Design Study의 4번째 모임이 있었습니다.
이번 스터디에서는 BNN 학습을 Cost Function을 정의하고 최적화하여 접근하는 방식을 소개한 XNOR-Net과 1x1 Conv와 3x3 Conv의 조합을 통해 Network를 Reduction하는 SqueezeNet을 다루었습니다! 두 발표자분 모두 좋은 발표해주셔서 유익한 시간이었습니다 📷
이번에 제가 발표한 논문은 FAIR(Facebook AI Research)에서 나온 One ticket to win them all: generalizing lottery ticket initializations across datasets and optimizers 입니다
한 장의 ticket으로 모든 복권에서 1등을 할 수 있다면 얼마나 좋을까요?
일반적인 network pruning 방법은 pruning 하기 이전에 학습된 network weight를 그대로 사용하면서 fine tuning하는 방법을 사용해왔습니다
pruning한 이후에 network에 weight를 random intialization한 후 학습하면 성능이 잘 나오지 않는 문제가 있었는데요
작년 MIT에서 나온 Lottery ticket hypothesis라는 논문에서는 이렇게 pruning된 이후의 network를 어떻게 random intialization하면 높은 성능을 낼 수 있는지
이 intialization 방법을 공개하며 lottery ticket의 winning ticket이라고 이름붙였습니다.
그런데 이 winning ticket이 혹시 다른 dataset이나 다른 optimizer를 사용하는 경우에도 잘 동작할 수 있을까요?
예를 들어 CIFAR10에서 찾은 winning ticket이 ImageNet에서도 winning ticket의 성능을 나타낼 수 있을까요?
이 논문은 이러한 질문에 대한 답을 실험을 통해서 확인하였고, initialization에 대한 여러가지 insight를 담고 있습니다.
2017년 8월에 인공지능을 처음 입문하였는데, 어느덧 2년이 지나 학교를 졸업했네요. 잠시 백수 라이프를 즐기고 있는데, 인공지능을 공부하면서 느꼈던 점들과 공부자료들을 공유하고 싶어 이렇게 글을 남깁니다.
1. 주변의 변화
저보다 더 오래되신 분들도 많으시겠지만, 2년 전만 하더라도 주변에 딥러닝을 하는 사람들이 많이 없었습니다. 그런데 요즘에는 기계/ 재료/ 화학 등 여러 학과에서 딥러닝을 많이 하고 있고, 딥러닝/ 데이터 사이언티스트로 취직하기위한 허들도 조금씩 낮아지고 있는 것 같습니다. 당장 저희 학교/ 학과만 보더라도 다들 딥러닝 한다고(작년이랑 올해 캡스톤 디자인 수상한 팀이 다 딥러닝을 사용한 팀이네요 ㅋㅋ)하고 있고, 대학교 마지막 학기인 저의 친형은 재료 물성치를 예측하는 딥러닝 모델을 만드는 데 도와달라고 하네요 ㅋㅋ. 정말 재미있는 현상 같습니다.
2. 수학 vs 코딩
6개월 전까지만 하더라도 저는 수학 파였는데, 요즘은 균형 잡힌 인재가 더 필요한 것 같습니다. 또한, 코딩보다 수학을 위주로 공부하여 취직하고 싶다면 석사 또는 박사의 학력이 필요한 것 같습니다. 이 부분에 대해서 결정을 하기위해서는 사이언티스트로 취업을 할지 엔지니어로 취직을 할지 먼저 결정하는게 좋을 것 같네요. 일반적으로 사이언티스트는 수학을 좀 더 공부하면 좋을 것 같고, 엔지니어는 전산과목을 좀 더 공부하면 좋을 것 같습니다. 인공지능에는 많은 통계/수학적 지식이 필요합니다. 물론 몰라도 코딩은 할 수 있고, 이를 응용하여 사용할 수 있지만, 수학을 모르고는 그 한계가 분명합니다. 반면에 수학을 잘하더라도, 이를 구현하지 못 하면 소용 없음으로, 둘 중에 하나를 정하여 집중하되 다른 한 쪽도 기초는 공부하는게 좋을 것 같네요ㅎ
개인적으로 수학은 선형대수학, 수리통계학, 회귀분석은 수강하는 게 좋다고 생각하며,
전산 과목은(잘 모르지만) 자료구조, 알고리즘, 컴퓨터 구조 정도는 알고 있어야 한다고 생각합니다(물론 제가 다 들었다는 것은 아닙니다. ㅋㅋ)
3. 텐서플로우 VS 파이토치
저는 지금도 텐서플로우를 사용하여 코딩하고 있습니다. 텐서플로우는 빠르고, 오픈 소스가 많다는 장점이 있지만, GPU버전을 설치하기가 힘들며, 병렬처리를 하기 힘들다는 단점을 가지고 있습니다. 반면 파이토치는 병렬처리가 텐서플로우에 비해서는 정말 쉽고 코드를 짜는 것도 편하다는 장점이 있습니다. 개인적으로는 한 라이브러리를 깊이 있게 공부하고, 나머지 다른 라이브러리는 읽을 수 있는 정도만 공부하면 될 것 같습니다.
4. 컴퓨터 비전 vs 자연어 처리 vs 강화학습
아주 예민한 주제인데, 저의 생각은 자신이 하고 싶은 거로 하되 각 분야의 유명 모델 정도는 공부하자 입니다(너무 식상한가요? ㅎ). 여기는 학생분들도 많이 계시니까 취업을 기준으로 먼저 말하면 현재 기준 자연어 처리 > 컴퓨터 비전 > 강화학습 순으로 일자리가 많지만, 각 분야에서 두각을 드러낸다면 이는 문제 될 일이 없는 것 같습니다. GAN은 컴퓨터 비전에서 유명한 모델입니다. 하지만 데이터의 확률분포를 학습하기 위한 방법으로 자연어처리 분야의 음성 합성 부분에서 자주 등장하며, 최근 자연어 처리의 핫 모델 BERT는 컴퓨터 비전의 SELFIE라는 사전학습 방법으로 응용되어 제안되기도 했습니다. 이처럼 자신이 원하는 도메인을 잡아 공부하되, 다른 분야의 핫 모델들도 같이 공부한다면 이를 응용하여 좋은 결과를 낼 수도 있다고 생각합니다.
5. 구현에 관한 생각
우리는 머신러닝 모델을 공부할 때 깃허브에서 “Generative adversarial networks tensorflow”라고 검색하여 나온 코드를 사용하곤 합니다. 하지만 공부를 하면서 느꼈던 것은 가짜 구현이 정말 많다는 것 이였습니다. 실제로 저의 경우, Spectral Normalization GANs의 코드가 필요해 깃허브 스타가 좀 있는 분의 구현을 다운받아서 연구에 사용했습니다. 나중에 안 사실이지만 이는 가짜 구현이었고, FID와 Inception score를 찍어본 결과 논문에서 제시하는 값들에 한 참 못 미치는 결과가 나왔습니다. 이처럼 다른 사람의 코드를 가지고 오거나 직접 코드를 짜서 연구할 때는 철저한 검증 절차가 필수적이라고 생각합니다.
6. 머신러닝 및 딥러닝 강의 목록
최근에는 영어만 잘한다면 들을 수 있는 명강의들이 정말 많습니다. 영어를 잘 못 하는 저는 눈물만 나지만 ㅠㅠ, 주제별로 괜찮다 싶은 강의들을 모아봤습니다.