https://handong1587.github.io/deep_learning/2015/10/09/dl-resources.html
ImageNet
AlexNet
ImageNet Classification with Deep Convolutional Neural Networks
Network In Network
Network In Network

Batch-normalized Maxout Network in Network
GoogLeNet
Going Deeper with Convolutions
Building a deeper understanding of images
VGGNet
Very Deep Convolutional Networks for Large-Scale Image Recognition
Tensorflow VGG16 and VGG19
Inception-V2 / Inception-V3
Inception-V3 = Inception-V2 + BN-auxiliary (fully connected layer of the auxiliary classifier is also batch-normalized, not just the convolutions)
Rethinking the Inception Architecture for Computer Vision
Notes on the TensorFlow Implementation of Inception v3
https://pseudoprofound.wordpress.com/2016/08/28/notes-on-the-tensorflow-implementation-of-inception-v3/
Training an InceptionV3-based image classifier with your own dataset
ResNet
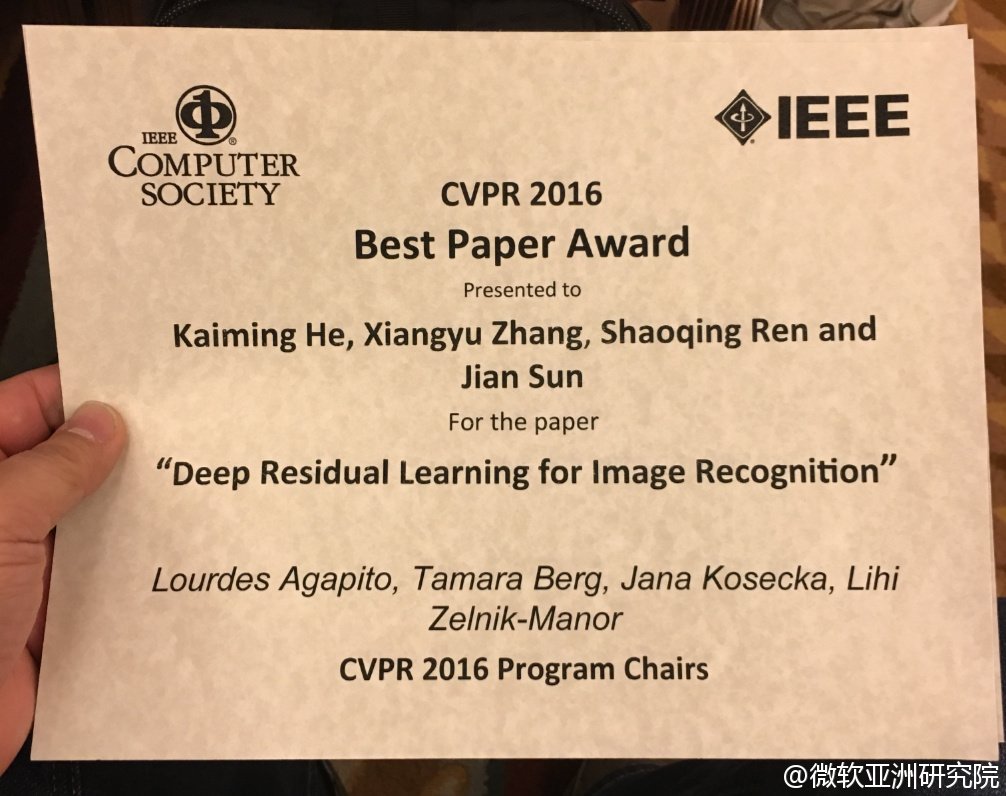
Deep Residual Learning for Image Recognition
Third-party re-implementations
https://github.com/KaimingHe/deep-residual-networks#third-party-re-implementations
Training and investigating Residual Nets
http://torch.ch/blog/2016/02/04/resnets.html
Highway Networks and Deep Residual Networks
Interpretating Deep Residual Learning Blocks as Locally Recurrent Connections
Resnet in Resnet: Generalizing Residual Architectures
ResNet-v2
Identity 89Mappings in Deep Residual Networks
Residual Networks are Exponential Ensembles of Relatively Shallow Networks
Wide Residual Networks
Deep Residual Networks for Image Classification with Python + NumPy

Residual Networks of Residual Networks: Multilevel Residual Networks
Inception-V4
Inception-V4, Inception-Resnet And The Impact Of Residual Connections On Learning
Inception-ResNet-v2
Striving for Simplicity: The All Convolutional Net
Systematic evaluation of CNN advances on the ImageNet
Deep Learning And Bayesian
Scalable Bayesian Optimization Using Deep Neural Networks
Bayesian Dark Knowledge
Memory-based Bayesian Reasoning with Deep Learning
Towards Bayesian Deep Learning: A Survey
Towards Bayesian Deep Learning: A Framework and Some Existing Methods
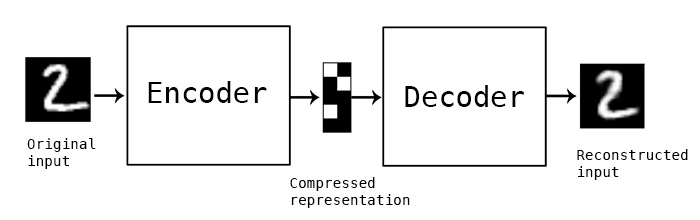
Autoencoders
Auto-Encoding Variational Bayes
The Potential Energy of an Autoencoder
Importance Weighted Autoencoders
Review of Auto-Encoders
Stacked What-Where Auto-encoders
Ladder Variational Autoencoders How to Train Deep Variational Autoencoders and Probabilistic Ladder Networks
Rank Ordered Autoencoders
Decoding Stacked Denoising Autoencoders
Keras autoencoders (convolutional/fcc)
Building Autoencoders in Keras
Review of auto-encoders
Autoencoders: Torch implementations of various types of autoencoders
Tutorial on Variational Autoencoders
Variational Autoencoders Explained
Introducing Variational Autoencoders (in Prose and Code)
Under the Hood of the Variational Autoencoder (in Prose and Code)
The Unreasonable Confusion of Variational Autoencoders
Semi-Supervised Learning
Semi-Supervised Learning with Graphs (Label Propagation)
Semi-Supervised Learning with Ladder Networks
Semi-supervised Feature Transfer: The Practical Benefit of Deep Learning Today?
Unsupervised Learning
Restricted Boltzmann Machine (RBM), Sparse Coding and Auto-encoder
On Random Weights and Unsupervised Feature Learning
Unsupervised Learning of Spatiotemporally Coherent Metrics
Unsupervised Visual Representation Learning by Context Prediction
Unsupervised Learning on Neural Network Outputs
Unsupervised Learning of Visual Representations by Solving Jigsaw Puzzles
Clustering
Joint Unsupervised Learning of Deep Representations and Image Clusters
Single-Channel Multi-Speaker Separation using Deep Clustering
Deep Embedded Clustering (DEC)
Unsupervised Deep Embedding for Clustering Analysis
Transfer Learning
How transferable are features in deep neural networks?
-intro: NIPS 2014 - arxiv: http://arxiv.org/abs/1411.1792
Learning and Transferring Mid-Level Image Representations using Convolutional Neural Networks
Simultaneous Deep Transfer Across Domains and Tasks

Net2Net: Accelerating Learning via Knowledge Transfer
Transfer Learning from Deep Features for Remote Sensing and Poverty Mapping
A theoretical framework for deep transfer learning
Transfer learning using neon
Hyperparameter Transfer Learning through Surrogate Alignment for Efficient Deep Neural Network Training
What makes ImageNet good for transfer learning?
Multi-label Learning
CNN: Single-label to Multi-label
Deep Learning for Multi-label Classification
Predicting Unseen Labels using Label Hierarchies in Large-Scale Multi-label Learning(ECML2015)
Learning with a Wasserstein Loss
From Softmax to Sparsemax: A Sparse Model of Attention and Multi-Label Classification
CNN-RNN: A Unified Framework for Multi-label Image Classification
Improving Multi-label Learning with Missing Labels by Structured Semantic Correlations
Multi-task Learning
Multitask Learning / Domain Adaptation
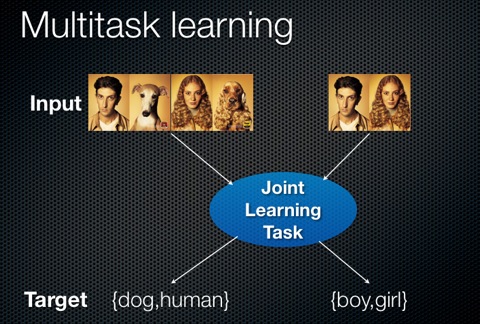
multi-task learning
OverFeat: Integrated Recognition, Localization and Detection using Convolutional Networks
Learning and Transferring Multi-task Deep Representation for Face Alignment
Multi-task learning of facial landmarks and expression
Heterogeneous multi-task learning for human pose estimation with deep convolutional neural network
Deep Joint Task Learning for Generic Object Extraction

Multi-Task Deep Visual-Semantic Embedding for Video Thumbnail Selection
Learning deep representation of multityped objects and tasks
Cross-stitch Networks for Multi-task Learning
Multi-Task Learning in Tensorflow (Part 1)
一箭N雕:多任务深度学习实战
Multi-modal Learning
Multimodal Deep Learning
Multimodal Convolutional Neural Networks for Matching Image and Sentence

A C++ library for Multimodal Deep Learning
Multimodal Learning for Image Captioning and Visual Question Answering
Multi modal retrieval and generation with deep distributed models
Learning Aligned Cross-Modal Representations from Weakly Aligned Data

Variational methods for Conditional Multimodal Deep Learning
Debugging Deep Learning
Some tips for debugging deep learning
Introduction to debugging neural networks
How to Visualize, Monitor and Debug Neural Network Learning
Adversarial Examples of Deep Learning
Intriguing properties of neural networks
- arxiv: http://arxiv.org/abs/1312.6199
- my notes: In each layer of a deep network it is the “direction” of “space” (ensemble of feature activations) which encodes useful class information rather than individual units (feature activations).
Deep Neural Networks are Easily Fooled: High Confidence Predictions for Unrecognizable Images
Explaining and Harnessing Adversarial Examples
Distributional Smoothing with Virtual Adversarial Training
Confusing Deep Convolution Networks by Relabelling
Exploring the Space of Adversarial Images
Learning with a Strong Adversary
Adversarial examples in the physical world
DeepFool
DeepFool: a simple and accurate method to fool deep neural networks
Adversarial Autoencoders
Understanding Adversarial Training: Increasing Local Stability of Neural Nets through Robust Optimization
(Deep Learning’s Deep Flaws)’s Deep Flaws (By Zachary Chase Lipton)
Deep Learning Adversarial Examples – Clarifying Misconceptions
Adversarial Machines: Fooling A.Is (and turn everyone into a Manga)
How to trick a neural network into thinking a panda is a vulture
Deep Learning Networks
PCANet: A Simple Deep Learning Baseline for Image Classification?
Deeply-supervised Nets (DSN)

Striving for Simplicity: The All Convolutional Net
Pointer Networks
Rectified Factor Networks
FlowNet: Learning Optical Flow with Convolutional Networks
Correlational Neural Networks
Diversity Networks
A Unified Approach for Learning the Parameters of Sum-Product Networks (SPN)
Recombinator Networks: Learning Coarse-to-Fine Feature Aggregation
Dynamic Capacity Networks
![]()
Bitwise Neural Networks
Learning Discriminative Features via Label Consistent Neural Network
A Theory of Generative ConvNet
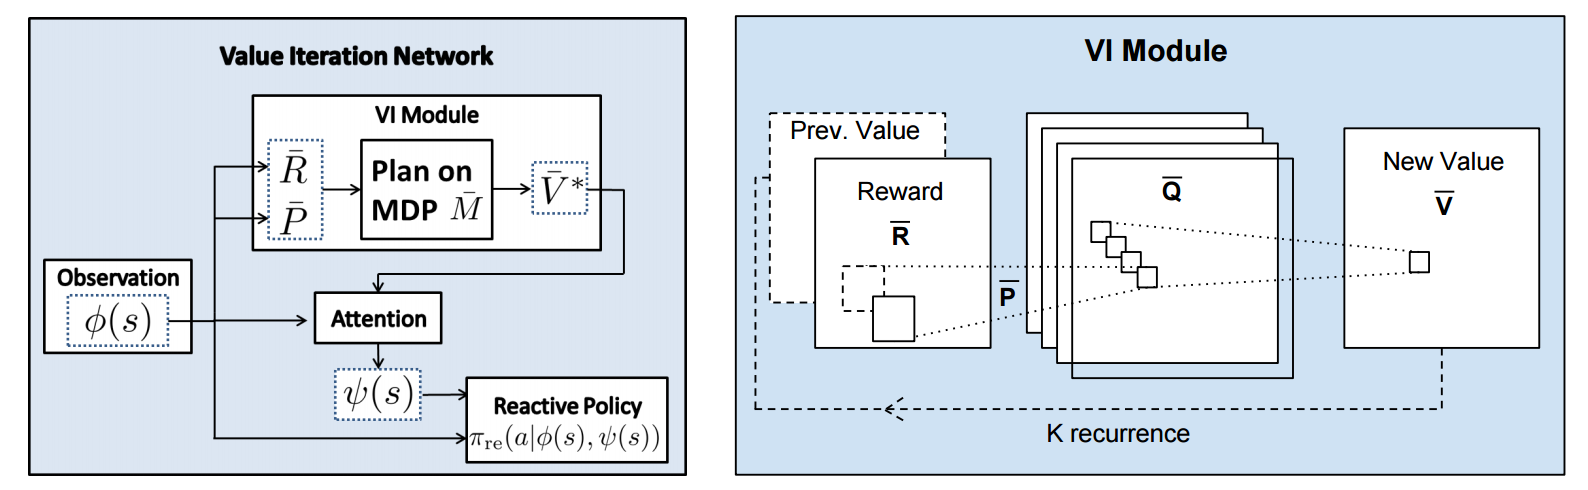
Value Iteration Networks
How to Train Deep Variational Autoencoders and Probabilistic Ladder Networks
Group Equivariant Convolutional Networks (G-CNNs)
Deep Spiking Networks
Low-rank passthrough neural networks
XNOR-Net: ImageNet Classification Using Binary Convolutional Neural Networks
Deeply-Fused Nets
SNN: Stacked Neural Networks
Convolutional Neural Fabrics
Holistic SparseCNN: Forging the Trident of Accuracy, Speed, and Size
Factorized Convolutional Neural Networks
Mollifying Networks
Local Binary Convolutional Neural Networks
DenseNet
Densely Connected Convolutional Networks

CliqueCNN: Deep Unsupervised Exemplar Learning
Convexified Convolutional Neural Networks
Highway Networks
Highway Networks
Very Deep Learning with Highway Networks
Training Very Deep Networks (highway networks)
Spatial Transformer Networks

The power of Spatial Transformer Networks

Recurrent Spatial Transformer Networks
Deep Learning with Traditional Machine Learning Methods
Cascade
Compact Convolutional Neural Network Cascade for Face Detection
Bag of Words (BoW)
Deep Learning Transcends the Bag of Words
Bootstrap
Training Deep Neural Networks on Noisy Labels with Bootstrapping
Decision Tree
Neural Network and Decision Tree
Decision Forests, Convolutional Networks and the Models in-Between
SVM
Large-scale Learning with SVM and Convolutional for Generic Object Categorization
Convolutional Neural Support Vector Machines:Hybrid Visual Pattern Classifiers for Multi-robot Systems
Deep Learning using Linear Support Vector Machines
Deep Learning and Robots
Robot Learning Manipulation Action Plans by “Watching” Unconstrained Videos from the World Wide Web
Robots that can adapt like animals (Nature 2014)
End-to-End Training of Deep Visuomotor Policies
Comment on Open AI’s Efforts to Robot Learning
The Curious Robot: Learning Visual Representations via Physical Interactions
Deep Learning on Mobile Devices
Convolutional neural networks on the iPhone with VGGNet

Deep Learning in Finance
Deep Learning in Finance
A Survey of Deep Learning Techniques Applied to Trading
Applications
Some like it hot - visual guidance for preference prediction
Deep Learning Algorithms with Applications to Video Analytics for A Smart City: A Survey
Deep-Spying: Spying using Smartwatch and Deep Learning
Camera identification with deep convolutional networks
Build an AI Cat Chaser with Jetson TX1 and Caffe
An Analysis of Deep Neural Network Models for Practical Applications
8 Inspirational Applications of Deep Learning
16 Open Source Deep Learning Models Running as Microservices

-intro: Places 365 Classifier, Deep Face Recognition, Real Estate Classifier, Colorful Image Colorization, Illustration Tagger, InceptionNet, Parsey McParseface, ArtsyNetworks - blog: http://blog.algorithmia.com/2016/07/open-source-deep-learning-algorithm-roundup/
Makeup like a superstar: Deep Localized Makeup Transfer Network
Deep Cascaded Bi-Network for Face Hallucination
DeepWarp: Photorealistic Image Resynthesis for Gaze Manipulation

Autoencoding Blade Runner
A guy trained a machine to “watch” Blade Runner. Then things got seriously sci-fi.
http://www.vox.com/2016/6/1/11787262/blade-runner-neural-network-encoding
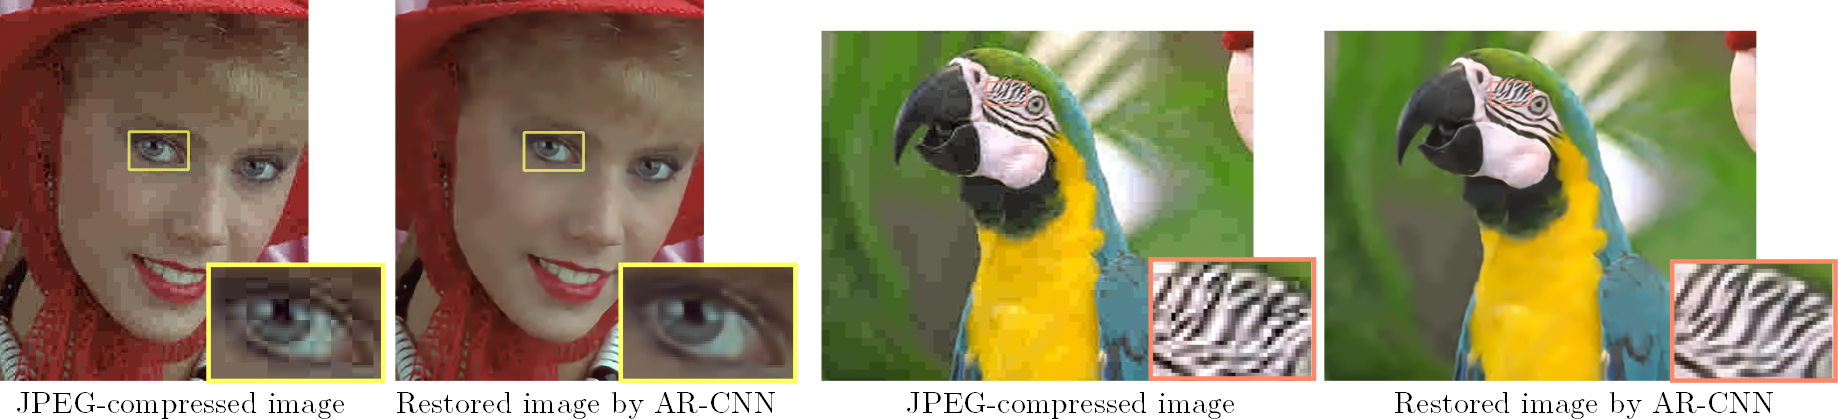
Deep Convolution Networks for Compression Artifacts Reduction
Deep GDashboard: Visualizing and Understanding Genomic Sequences Using Deep Neural Networks
Photo Filter Recommendation by Category-Aware Aesthetic Learning
- intro: Filter Aesthetic Comparison Dataset (FACD): 28,000 filtered images and 42,240 reliable image pairs with aesthetic comparison annotations
- arxiv: http://arxiv.org/abs/1608.05339
Instagram photos reveal predictive markers of depression
How an Algorithm Learned to Identify Depressed Individuals by Studying Their Instagram Photos
IM2CAD
Fast, Lean, and Accurate: Modeling Password Guessability Using Neural Networks
Defeating Image Obfuscation with Deep Learning
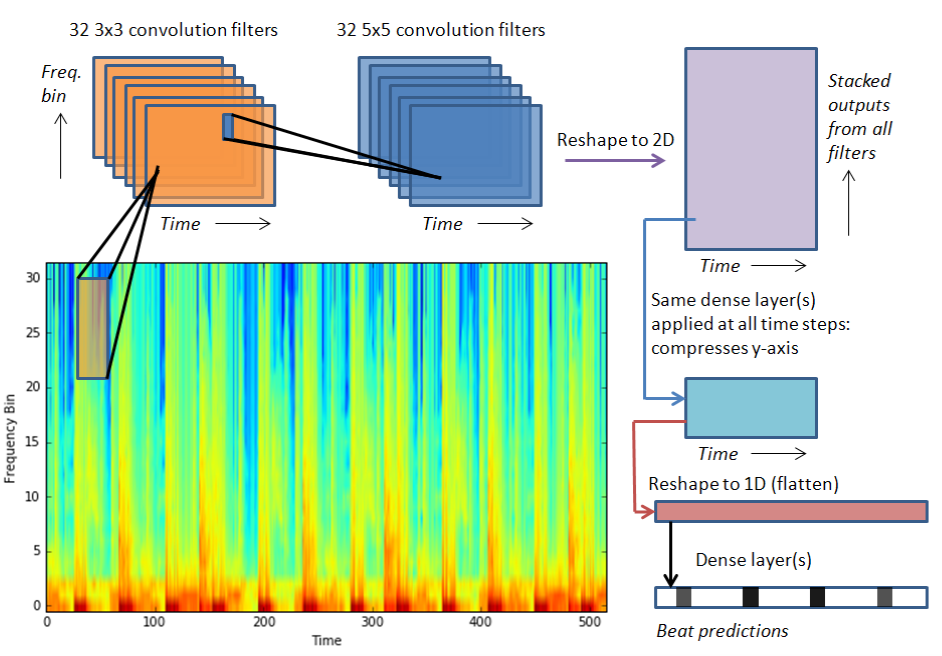
Detecting Music BPM using Neural Networks
Age Estimation
Deeply-Learned Feature for Age Estimation
Age and Gender Classification using Convolutional Neural Networks

Recurrent Face Aging
Emotion / Expression Recognition
Real-time emotion recognition for gaming using deep convolutional network features
Emotion Recognition in the Wild via Convolutional Neural Networks and Mapped Binary Patterns

DeXpression: Deep Convolutional Neural Network for Expression Recognition
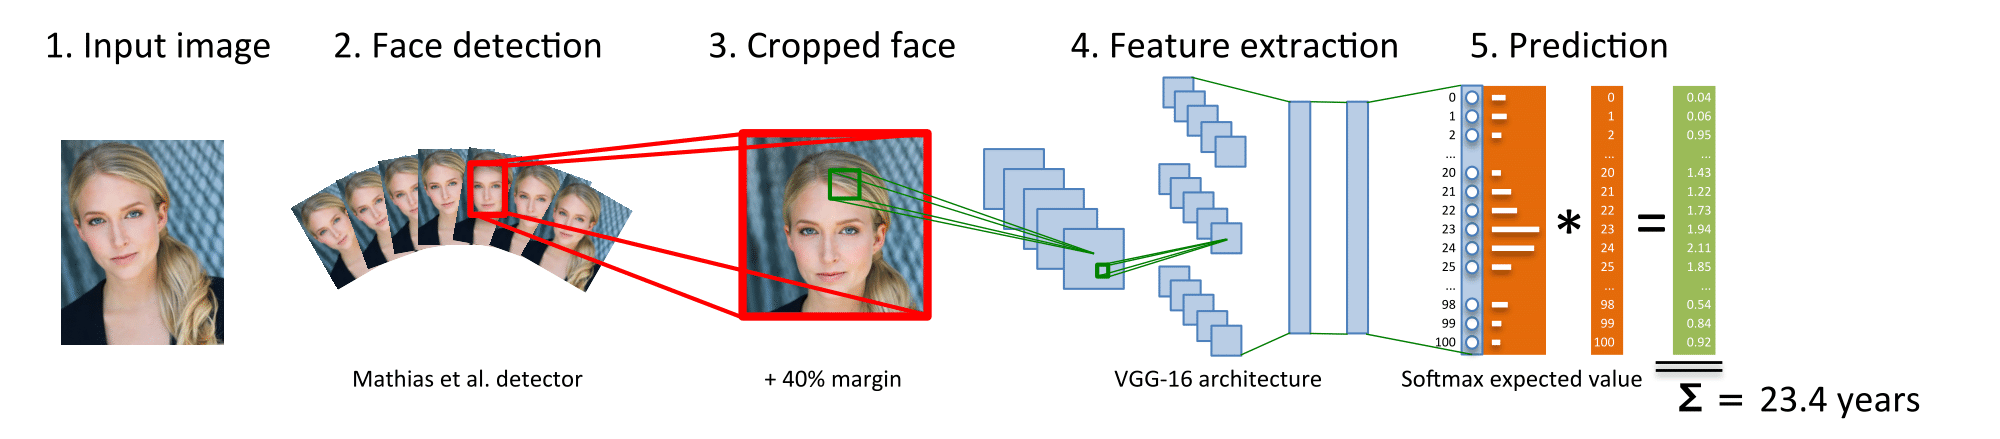
DEX: Deep EXpectation of apparent age from a single image
How Deep Neural Networks Can Improve Emotion Recognition on Video Data
Peak-Piloted Deep Network for Facial Expression Recognition
Training Deep Networks for Facial Expression Recognition with Crowd-Sourced Label Distribution
A Recursive Framework for Expression Recognition: From Web Images to Deep Models to Game Dataset
-arxiv: http://arxiv.org/abs/1608.01647
EmotioNet
EmotioNet: EmotioNet: An accurate, real-time algorithm for the automatic annotation of a million facial expressions in the wild
Attribution Prediction
PANDA: Pose Aligned Networks for Deep Attribute Modeling
Predicting psychological attributions from face photographs with a deep neural network
Learning Human Identity from Motion Patterns
Pose Estimation
DeepPose: Human Pose Estimation via Deep Neural Networks
Flowing ConvNets for Human Pose Estimation in Videos
Structured Feature Learning for Pose Estimation
Convolutional Pose Machines
Model-based Deep Hand Pose Estimation
Stacked Hourglass Networks for Human Pose Estimation

Chained Predictions Using Convolutional Neural Networks
DeeperCut: A Deeper, Stronger, and Faster Multi-Person Pose Estimation Model
Sentiment Prediction
From Pixels to Sentiment: Fine-tuning CNNs for Visual Sentiment Prediction
Predict Sentiment From Movie Reviews Using Deep Learning
Neural Sentiment Classification with User and Product Attention
Place Recognition
NetVLAD: CNN architecture for weakly supervised place recognition

PlaNet - Photo Geolocation with Convolutional Neural Networks

Camera Relocalization
PoseNet: A Convolutional Network for Real-Time 6-DOF Camera Relocalization
Modelling Uncertainty in Deep Learning for Camera Relocalization
Crowd Counting / Analysis
Large scale crowd analysis based on convolutional neural network
Cross-scene Crowd Counting via Deep Convolutional Neural Networks
Single-Image Crowd Counting via Multi-Column Convolutional Neural Network
CrowdNet
CrowdNet: A Deep Convolutional Network for Dense Crowd Counting
Music / Sound Classification
Explaining Deep Convolutional Neural Networks on Music Classification
Deep Convolutional Neural Networks and Data Augmentation for Environmental Sound Classification
NSFW Detection / Classification
Nipple Detection using Convolutional Neural Network
Applying deep learning to classify pornographic images and videos
MODERATE, FILTER, OR CURATE ADULT CONTENT WITH CLARIFAI’S NSFW MODEL
WHAT CONVOLUTIONAL NEURAL NETWORKS LOOK AT WHEN THEY SEE NUDITY
Image Reconstruction / Inpainting
Context Encoders: Feature Learning by Inpainting

Semantic Image Inpainting with Perceptual and Contextual Losses
Image Restoration
Image Restoration Using Very Deep Convolutional Encoder-Decoder Networks with Symmetric Skip Connections
Image Restoration Using Convolutional Auto-encoders with Symmetric Skip Connections
Image Completion with Deep Learning in TensorFlow
Image Super-Resolution
Image Super-Resolution Using Deep Convolutional Networks

Learning a Deep Convolutional Network for Image Super-Resolution
Shepard Convolutional Neural Networks


Bicubic VS. Shepard CNN
Bidirectional Recurrent Convolutional Networks for Multi-Frame Super-Resolution
Deeply-Recursive Convolutional Network for Image Super-Resolution
Accurate Image Super-Resolution Using Very Deep Convolutional Networks
Super-Resolution with Deep Convolutional Sufficient Statistics
Deep Depth Super-Resolution : Learning Depth Super-Resolution using Deep Convolutional Neural Network
Local- and Holistic- Structure Preserving Image Super Resolution via Deep Joint Component Learning
End-to-End Image Super-Resolution via Deep and Shallow Convolutional Networks
Accelerating the Super-Resolution Convolutional Neural Network
srez: Image super-resolution through deep learning
Image Denoising
Beyond a Gaussian Denoiser: Residual Learning of Deep CNN for Image Denoising
Medical image denoising using convolutional denoising autoencoders
Image Haze Removal
DehazeNet: An End-to-End System for Single Image Haze Removal
Blur Detection and Removal
Learning to Deblur
Learning a Convolutional Neural Network for Non-uniform Motion Blur Removal
End-to-End Learning for Image Burst Deblurring
Image Compression
An image compression and encryption scheme based on deep learning
Full Resolution Image Compression with Recurrent Neural Networks
Depth Prediction
Deeper Depth Prediction with Fully Convolutional Residual Networks

Texture Synthesis
Texture Synthesis Using Convolutional Neural Networks
Combining Markov Random Fields and Convolutional Neural Networks for Image Synthesis
Texture Networks: Feed-forward Synthesis of Textures and Stylized Images
Precomputed Real-Time Texture Synthesis with Markovian Generative Adversarial Networks
Generative Adversarial Text to Image Synthesis

Image Tagging
Flexible Image Tagging with Fast0Tag
Music Tagging
Automatic tagging using deep convolutional neural networks
Benchmarks
Deep Learning’s Accuracy
Benchmarks for popular CNN models
https://github.com/jcjohnson/cnn-benchmarks
Papers
Reweighted Wake-Sleep
Probabilistic Backpropagation for Scalable Learning of Bayesian Neural Networks
Deeply-Supervised Nets
Deep learning
On the Expressive Power of Deep Learning: A Tensor Analysis
Understanding and Predicting Image Memorability at a Large Scale
Towards Open Set Deep Networks
Structured Prediction Energy Networks (SPEN)
A Mathematical Theory of Deep Convolutional Neural Networks for Feature Extraction
Deep Neural Networks predict Hierarchical Spatio-temporal Cortical Dynamics of Human Visual Object Recognition
A Mathematical Theory of Deep Convolutional Neural Networks for Feature Extraction
Understanding Deep Convolutional Networks
DeepCare: A Deep Dynamic Memory Model for Predictive Medicine
Exploiting Cyclic Symmetry in Convolutional Neural Networks

Cross-dimensional Weighting for Aggregated Deep Convolutional Features
Understanding Visual Concepts with Continuation Learning
Learning Efficient Algorithms with Hierarchical Attentive Memory
DrMAD: Distilling Reverse-Mode Automatic Differentiation for Optimizing Hyperparameters of Deep Neural Networks
Do Deep Convolutional Nets Really Need to be Deep (Or Even Convolutional)?
Harnessing Deep Neural Networks with Logic Rules
Degrees of Freedom in Deep Neural Networks
Deep Networks with Stochastic Depth
LIFT: Learned Invariant Feature Transform
Understanding How Image Quality Affects Deep Neural Networks
Deep Embedding for Spatial Role Labeling
Learning Convolutional Neural Networks for Graphs
Unreasonable Effectiveness of Learning Neural Nets: Accessible States and Robust Ensembles
Learning Deep Representation for Imbalanced Classification
FractalNet
FractalNet: Ultra-Deep Neural Networks without Residuals

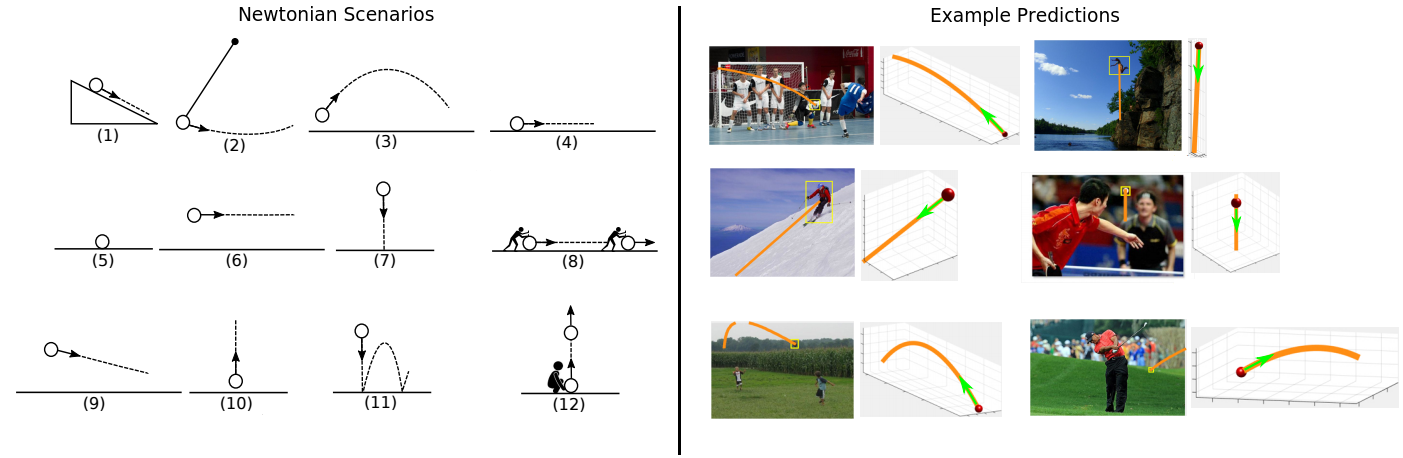
Newtonian Image Understanding: Unfolding the Dynamics of Objects in Static Images
Convolutional Neural Networks Analyzed via Convolutional Sparse Coding
Recent Advances in Convolutional Neural Networks
TI-POOLING: transformation-invariant pooling for feature learning in Convolutional Neural Networks
Why does deep and cheap learning work so well?
STDP
A biological gradient descent for prediction through a combination of STDP and homeostatic plasticity
An objective function for STDP
Towards a Biologically Plausible Backprop
Target Propagation
How Auto-Encoders Could Provide Credit Assignment in Deep Networks via Target Propagation
Difference Target Propagation
CNN with Computer Vision
End-to-End Integration of a Convolutional Network, Deformable Parts Model and Non-Maximum Suppression
A convnet for non-maximum suppression
A Taxonomy of Deep Convolutional Neural Nets for Computer Vision
Projects
Top Deep Learning Projects
deepnet: Implementation of some deep learning algorithms
DeepNeuralClassifier(Julia): Deep neural network using rectified linear units to classify hand written digits from the MNIST dataset
Clarifai Node.js Demo
Visual Search Server

Deep Learning in Rust
Implementation of state-of-art models in Torch
Deep Learning (Python, C, C++, Java, Scala, Go)
deepmark: THE Deep Learning Benchmarks
Siamese Net
- intro: “This package shows how to train a siamese network using Lasagne and Theano and includes network definitions for state-of-the-art networks including: DeepID, DeepID2, Chopra et. al, and Hani et. al. We also include one pre-trained model using a custom convolutional network.”
- github: https://github.com/Kadenze/siamese_net
PRE-TRAINED CONVNETS AND OBJECT LOCALISATION IN KERAS
Deep Learning algorithms with TensorFlow: Ready to use implementations of various Deep Learning algorithms using TensorFlow
Fast Multi-threaded VGG 19 Feature Extractor
Live demo of neural network classifying images
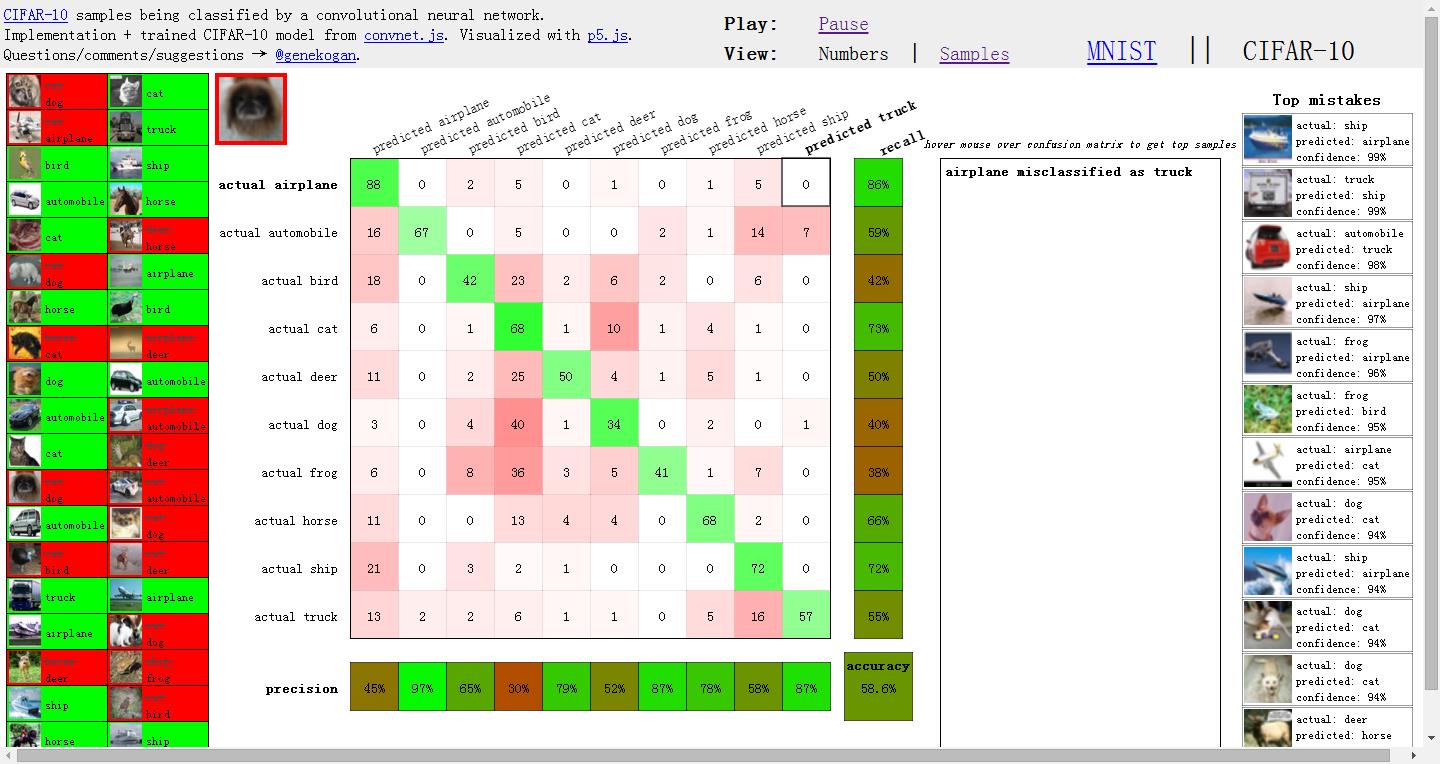
http://ml4a.github.io/dev/demos/cifar_confusion.html#
mojo cnn: c++ convolutional neural network
DeepHeart: Neural networks for monitoring cardiac data
Deep Water: Deep Learning in H2O using Native GPU Backends
![]()
Greentea LibDNN: Greentea LibDNN - a universal convolution implementation supporting CUDA and OpenCL
Dracula: A spookily good Part of Speech Tagger optimized for Twitter
Trained image classification models for Keras
PyCNN: Cellular Neural Networks Image Processing Python Library

regl-cnn: Digit recognition with Convolutional Neural Networks in WebGL
gvnn
gvnn: Neural Network Library for Geometric Computer Vision
Readings and Questions
What you wanted to know about AI
http://fastml.com/what-you-wanted-to-know-about-ai/
Epoch vs iteration when training neural networks
Questions to Ask When Applying Deep Learning
http://deeplearning4j.org/questions.html
How can I know if Deep Learning works better for a specific problem than SVM or random forest?
What is the difference between deep learning and usual machine learning?
Resources
Awesome Deep Learning
Awesome-deep-vision: A curated list of deep learning resources for computer vision
Applied Deep Learning Resources: A collection of research articles, blog posts, slides and code snippets about deep learning in applied settings.
Deep Learning Libraries by Language
Deep Learning Resources
http://yanirseroussi.com/deep-learning-resources/
Deep Learning Resources
https://omtcyfz.github.io/2016/08/29/Deep-Learning-Resources.html
Turing Machine: musings on theory & code(DEEP LEARNING REVOLUTION, summer 2015, state of the art & topnotch links)
https://vzn1.wordpress.com/2015/09/01/deep-learning-revolution-summer-2015-state-of-the-art-topnotch-links/
BICV Group: Biologically Inspired Computer Vision research group
http://www.bicv.org/deep-learning/
Learning Deep Learning
http://rt.dgyblog.com/ref/ref-learning-deep-learning.html
Summaries and notes on Deep Learning research papers
Deep Learning Glossary
The Deep Learning Playbook
https://medium.com/@jiefeng/deep-learning-playbook-c5ebe34f8a1a#.eg9cdz5ak
Deep Learning Study: Study of HeXA@UNIST in Preparation for Submission
Deep Learning Books
awesome-very-deep-learning: A curated list of papers and code about very deep neural networks (50+ layers)
Deep Learning Resources and Tutorials using Keras and Lasagne
Deep Learning: Definition, Resources, Comparison with Machine Learning

Awesome - Most Cited Deep Learning Papers
The most cited papers in computer vision and deep learning
deep learning papers: A place to collect papers that are related to deep learning and computational biology
papers-I-read
LEARNING DEEP LEARNING - MY TOP-FIVE LIST
Attention
DNNGraph - A deep neural network model generation DSL in Haskell
Deep playground: an interactive visualization of neural networks, written in typescript using d3.js
Neural Network Package
- intro: This package provides an easy and modular way to build and train simple or complex neural networks using Torch
- github: https://github.com/torch/nn
deepdish: Deep learning and data science tools from the University of Chicago deepdish: Serving Up Chicago-Style Deep Learning
AETROS CLI: Console application to manage deep neural network training in AETROS Trainer
Books
Deep Learning
Fundamentals of Deep Learning: Designing Next-Generation Artificial Intelligence Algorithms
FIRST CONTACT WITH TENSORFLOW: Get started with with Deep Learning programming
Make Your Own Neural Network: IPython Neural Networks on a Raspberry Pi Zero
Blogs
Neural Networks and Deep Learning
http://neuralnetworksanddeeplearning.com
Deep Learning Reading List
http://deeplearning.net/reading-list/
WILDML: A BLOG ABOUT MACHINE LEARNING, DEEP LEARNING AND NLP.
http://www.wildml.com/
Andrej Karpathy blog
http://karpathy.github.io/
Rodrigob’s github page
http://rodrigob.github.io/
colah’s blog
http://colah.github.io/
What My Deep Model Doesn’t Know…
http://mlg.eng.cam.ac.uk/yarin/blog_3d801aa532c1ce.html
Christoph Feichtenhofer


 window_tensorflow.zip


 Universal-USB-Installer-1.9.5.5.exe


 ,
,  ,
,  ~
~  )에 상응하는 크기를 가집니다.
 출력 특성 맵의 갯수
 입력 특성 맵의 갯수
 축 방향의 커널 크기
 에 영향을 미치는 속성은 다음과 같습니다.
 :
:  :
:  :
:  :
: 
 = 2,
= 2,  =
=  = 5,
= 5,  = 3,
= 3,  =
=  = 2 그리고
  =
=  = 1 일 때 분할 콘볼루션의 출력값 계산
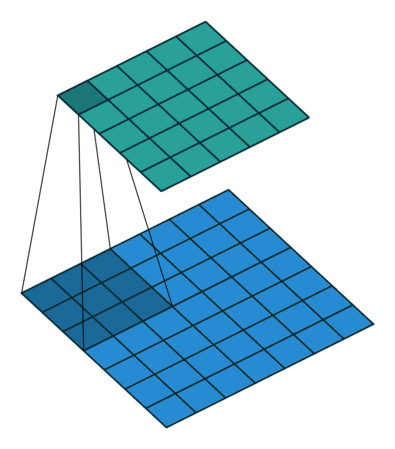
 를 사용한 두개의 입력 특성 맵에서 세개의 출력 특성 맵으로의 콘볼루션 매핑. 맨 왼쪽부터 입력 특성 맵 1 은 커널
  에 콘볼루션 되고 입력 특성 맵 2 는 커널
  에 콘볼루션 되어 그 계산 결과는 요소별로 더해져서 첫번째 출력 특성 맵을 만듭니다. 같은 방식으로 가운데와 오른쪽에 적용되어 두번째 세번째 특성 맵이 구성됩니다. 세개의 출력 특성 맵은 하나로 묶여져 최종 출력 값이 됩니다.

 )
) )
) )
) )
) )
) 그리고
그리고  ). 그림 2.1은
  이고
이고  일 때의 예입니다.
 와
와  에 대해
에 대해  + 1")
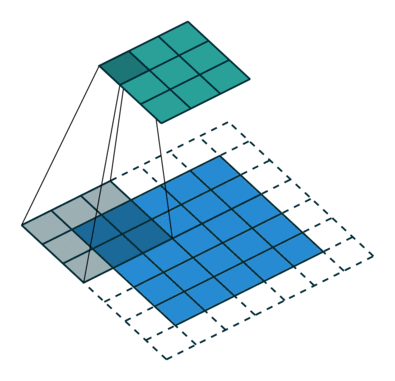
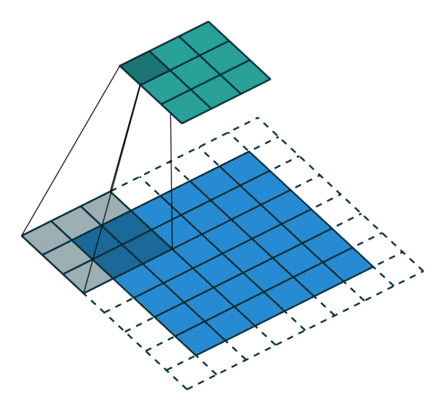
 개의 제로 패딩은 입력 사이즈
  로 바꿉니다. 일반적으로 쓰면 식 1을 사용하여 다음과 같은 식을 유도할 수 있습니다.
 + 2p + 1")
 ,
,  ,
,  일 때 예입니다.
 ) 만들어야 할 때가 있습니다.
 ,
,  ),
),  일 때,
일 때, = i + 2n - 2n = i")
 인 예입니다.
 ,
,  - (k - 1) = i + (k - 1)")
 이고
이고  인 예입니다.
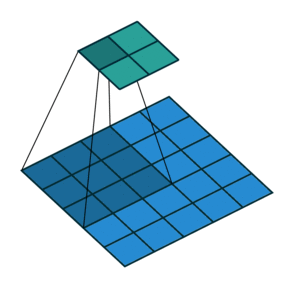
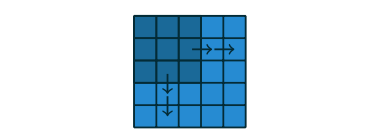
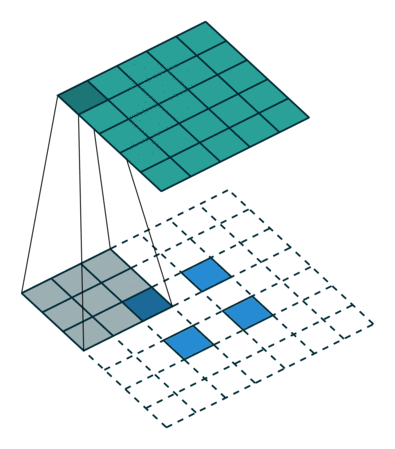
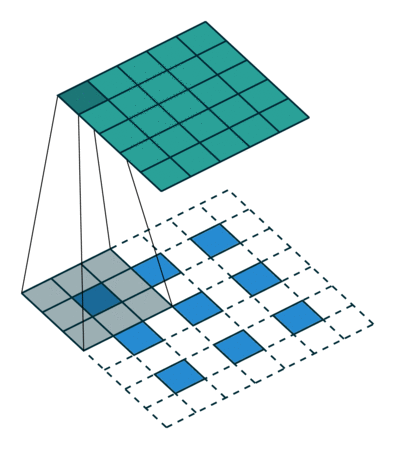
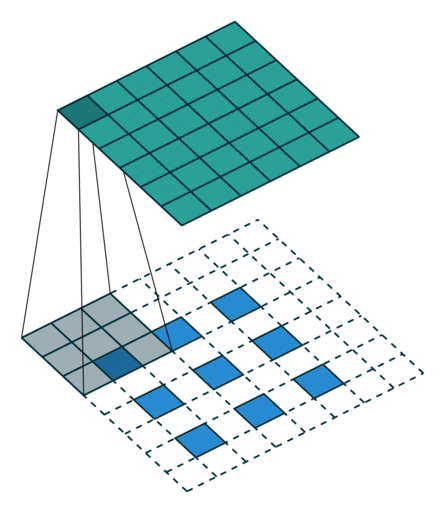
 만큼 보폭으로 입력의 오른쪽 끝까지 슬라이드 합니다. 출력 크키는 커널의 초기 위치를 반영하여 스텝 수에 1을 더한 값이 됩니다(그림 2.8b). 같은 방법으로 높이 방향 축에 적용합니다.
 을 대입한 것과 동일합니다)
 가
가  ,
,  은 같은 출력 크기를 만듭니다. 이런 동작은
  ,
, 

 원소(
원소( 로 나타낼 수 있습니다.
 를 곱하여 에러가 역전파되는 것이 한 예입니다. 이 연산은 4차원 벡터를 입력으로 받아 16차원 벡터를 출력으로 만들지만 연결 패턴은
 ^T = C") 를 각각 곱하는 전치 콘볼루션을 정의할 수 있습니다(실제로 전치 콘볼루션을 구현할 때 종종 사용하는 것처럼 전치 콘볼루션의 계산은 입력 값을 콘볼루션의 그래디언트로 생각할 수 있습니다).
를 각각 곱하는 전치 콘볼루션을 정의할 수 있습니다(실제로 전치 콘볼루션을 구현할 때 종종 사용하는 것처럼 전치 콘볼루션의 계산은 입력 값을 콘볼루션의 그래디언트로 생각할 수 있습니다). ,
,  ,
,  그리고
그리고  ). 커널과 스트라이드의 크기는 동일하지만 전치 콘볼루션의 입력은 제로 패딩되었습니다.(이 콘볼루션은 전치 콘볼루션과 동일하지만 추가된 제로 패딩 때문에 그림에서 0을 곱하는 연산이 많이 발생합니다. 하지만 이는 일러스트의 목적을 위해서이며 실제 소프트웨어 구현에서는 0을 곱하는 연산을 수행하지 않습니다.)
 그리고
그리고  인 전치 콘볼루션과 연관되어 있습니다. 그리고 출력 크기는,
")
 가 바뀐 식입니다)
 인 전치 콘볼루션과 연관되어 있고 이 출력의 크기는,
 - 2p")
 인 콘볼루션은
  인 전치 콘볼루션과 연관되어 있고 출력 사이즈는,
 - 2p = i' + 2n - 2n = i'")
 인 전치 콘볼루션과 연관되어 있고 출력사이즈는,
 - 2p = i - (k - 1)")
 인 동등한 콘볼루션과 관련이 있다고 기대할 수 있습니다. 앞으로 설명하겠지만 이 직감은 맞습니다. 그래서 전치 콘볼루션을 부분 스트라이드 콘볼루션으로 부르기도 합니다.
 가
가  가
가  ,
,  의 0이 추가되어 늘어난 크기 입니다. 이 출력의 크기는,
 + k")
 + k - 2p")
 를 만드는 입력 사이즈
  로 표현을 확장할 수 있습니다.
 mod s") 는 입력의 상단과 오른쪽에 추가된 0의 갯수를 나타냅니다. 이 출력의 크기는,
는 입력의 상단과 오른쪽에 추가된 0의 갯수를 나타냅니다. 이 출력의 크기는, + a + k - 2p")


novelmartis commentedon Apr 20
...